Pages

Sunday, May 19, 2024

Microsoft Autopilot for Imaging Computers – An Overview

Businesses are always in search of faster ways to manage their IT operations in the fast-moving digital world of today.  In the area of computer imaging and staging, major progress has been made recently.  Technology departments or IT departments normally dedicate a lot of time and resources to setting up new computers (or refurbishing old ones), installing operating systems, installing, and configuring programs specific to the department or person(s) that would be using it.  All of these processes can easily be done now with cloud based services such as Microsoft Autopilot.  Microsoft Autopilot provides a hassle free approach to deploying and managing systems.


So what is Microsoft Autopilot?

 Microsoft Autopilot is a cloud based service that allows IT professionals to setup and roll out new computers running Windows 10 or Windows 11 quickly. It simplifies the initial getting started process for their end users by automating the setup and configuration process. Using Autopilot, IT departments can make use of online tools to setup computers remotely and reducing the need for in-person configuration!


Some of the key benefits of Microsoft Autopilot:

  • Easier Deployment – Microsoft Autopilot makes deployment easier and eliminates the traditional imaging process of creating and maintaining custom images for different hardware configurations.  IT administrators instead can create deployment profiles and policies using the Microsoft Endpoint Manager system to keep their systems uniform.
  •  Zero-touch Provisioning – with Microsoft Autopilot, companies can order their computers and have them shipped directly from the factory, once they arrive and are set up, the end user would simply turn on the computer and complete the setup process themselves without the need of having IT staff on-site to setup and configure everything. This type of deployment would obviously depend on the competency level of the end user to be able to handle all of this, of course, so some companies might have to deploy tech staff but even then the work they would do would be less time consuming.
  • User Driven Experience – Microsoft Autopilot gives an experience that users can control, which allows them to adjust settings and add applications designed for their specific needs during the initial setup.  This allows users to help themselves while maintaining compliance with security requirements and keeping with company policies.
  • Increased Security – using Microsoft Autopilot together with Microsoft Intune, allows IT administrators to apply and enforce appropriate security policies, adjust settings on the computer, and allow the installation of software updates without having to be in front of the computer by doing it remotely.  Making sure that computers are maintaining compliance with company standards as well as protecting them from possible threats that come with out of date updates.


Getting started with Microsoft Autopilot

There are a few steps you need to process in order to start using Microsoft Autopilot.  Below is just an overview of these steps.

  • You will need to prepare your environment before deploying devices with Microsoft Autopilot, you will need to ensure that your company has valid Microsoft 365 subscriptions and access to the Micorsoft Endpoint Manager portal.  Also, you will need to register your companies devices with Microsoft Autopilot and configure the device enrollment settings.
  • You will need to create the Deployment Profiles using the Microsoft Endpoint Manager portals, you will create and configure the deployment profiles for your company needs, this will determine how the devices are provisioned. Among the settings configured in the deployment profile are the language, region, network configurations and user authentication methods.
  • You will need to upload device information, including hardware IDs (such as computer serial numbers or device hashes) and purchase information to the Microsoft Autopilot service. This allows it to identify and register the computer(s) when they are turned on for the very first time.
  • Assigning profiles to computers once they are registered and their information has been uploaded is fairly easy. You’ll assign the deployment profile to specific computers or groups of computers, this will make sure each computer downloads the proper configuration settings during the initial setup.
  • As mentioned before, with Microsoft Autopilot computers can be shipped out from the manufacturer to your end user without having to staged and imaged by your in house tech staff. Instead your end users simply power on the computer and follow the on screen instructions and complete the initial setup!
  • You will be able to monitor the deployment process through the Microsoft Endpoint Manager portal to make sure that computers are properly enrolled and configured based on the deployment profiles you have created.
  • It is recommended that you ask for and record any feedback from your end users and other administrators.  Using this feedback you can better tweak the settings and improve the deployment process using Microsoft Autopilot to improve the user experience, satisfaction and efficiency along the way.

Hopefully you found this information useful to determine whether or not using Microsoft Autopilot can give you and your company a fresh method of creating, imaging, and staging computers to make it easy to distribute and manage.


Saturday, May 11, 2024

Removing Microsoft OneDrive from Windows 11


Microsoft OneDrive is a cloud storage service that comes pre-installed with Windows 11. While it can be a easy tool for syncing and backing up your files, some people may prefer alternative cloud storage services or may not use cloud storage at all.

Removing OneDrive can free up system resources and declutter your system if you don't need or want to use it. For some users who do not prefer to have Microsoft OneDrive syncing their data to the cloud, I provide you with a few methods to remove it.

Removing Microsoft OneDrive from a computer running Windows 11 is a pretty simple process. Whether you want to uninstall it temporarily for troubleshooting purposes or permanently because you don't use it, there are several methods to accomplish this. 


Method 1: Uninstall OneDrive via Settings

  1. Open Settings by clicking on the Start menu, then click on the gear icon to open Settings. You can also press Win + I as a shortcut.
  2. Navigate to Apps in the Settings window, select "Apps" from the options.

  1. Click on "Installed Apps."
  2. Search for OneDrive in the search bar under "Apps > Installed Apps" type "OneDrive" to locate the OneDrive app.


  1. Click on three horizontal dots on the far right of the Microsoft OneDrive in the search results to expand its options.


  2. You should see an "Uninstall" button. Click on it, and Windows will prompt you to confirm the uninstallation. Follow the on-screen instructions to complete the uninstallation process.


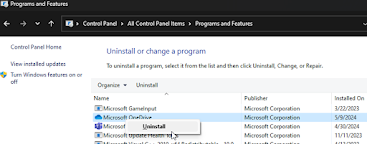
Method 2: Uninstall OneDrive via Control Panel

  1. Open Control Panel: You can open Control Panel by searching for it in the Start menu.
  2. Programs and Features: In Control Panel, click on "Programs" or "Programs and Features," depending on your view settings.
  3. Find OneDrive: Scroll through the list of installed programs to find Microsoft OneDrive.
  4. Uninstall OneDrive: Right-click on Microsoft OneDrive and select "Uninstall" or "Uninstall/Change" from the context menu. Follow any prompts that appear to complete the uninstallation.


Method 3: Uninstall OneDrive via PowerShell

  1. Open PowerShell: Right-click on the Start menu and select "Windows PowerShell (Admin)" to open PowerShell with administrative privileges.
  2. Uninstall OneDrive: In the PowerShell window, type the following command and press Enter: 

Get-AppxPackage *OneDrive* | Remove-AppxPackage

  1. Verify Uninstallation (Optional): After the command completes, you can verify that OneDrive has been uninstalled by typing onedrive in the Start menu search. If OneDrive is no longer present, it has been successfully uninstalled.


Method 4: Disable OneDrive Integration

If you prefer not to completely uninstall OneDrive but want to disable its integration with File Explorer and other parts of Windows:

  1. Open OneDrive Settings: Right-click on the OneDrive icon in the system tray (near the clock) and select "Settings."
  2. Disable OneDrive: In the Microsoft OneDrive settings window, go to the "Account" tab and click on "Unlink this PC." Follow the prompts to unlink your PC from OneDrive.
  3. Disable Startup: To prevent OneDrive from starting automatically with Windows, right-click on the Taskbar, select "Task Manager," go to the "Startup" tab, find "OneDrive," right-click on it, and select "Disable."

By following these methods, you can remove Microsoft OneDrive from your Windows 11 computer according to your preferences. Keep in mind that some methods may require administrative privileges, and it's always a good idea to back up any important files before making system changes.


MSPs – What Is It and How Is It Changing IT Departments?

In today’s IT world you have probably heard of the term MSP or Managed Service Provider.  This terminology has been around for awhile as MSPs have been around for a couple decades, at least since the 1990’s.  In the beginning they were known as an Application Service Provider (ASP), offering remote application hosting services.  This has since grown into a global service providing many services.


Unlocking Potential: The Transformative Power of Managed Service Providers (MSPs) in IT Departments

Businesses of all sizes rely heavily on technology to conduct the operations needed to run and make profit. From managing day-to-day tasks to global communication (such as email and instant messaging), technology plays a pivotal role in enhancing efficiency and productivity. With the rapid pace at which technology changes there is the challenge of needing costly staff who know how to manage and maintain the company’s complex IT infrastructure. This is where a Managed Service Provider (MSP) can step in to revolutionize the traditional IT departments, either by becoming the businesses IT department or to work alongside its existing IT department.

So, what exactly are MSPs?

Managed Service Providers are third-party companies that offer a wide range of IT services to businesses. These services range from maintaining and configuring network and infrastructure management to cybersecurity, server and data backups, cloud computing, and more. Unlike traditional IT support models where businesses hire in-house technicians or rely on break-fix solutions, an MSP usually offers proactive, subscription-based services. This means that instead of waiting for something to break before fixing it, MSPs actively monitor and manage IT systems to prevent issues from occurring in the first place.  Although many MSPs can be contracted to do the typical break-fix solutions, they can do so much more!

The rise of the MSP has changed how businesses approach their technology needs, here's how:

1.       Through Cost Efficiency: One of the main benefits of signing up with an MSP is cost efficiency. Rather than investing in expensive hardware, software licenses, and hiring and training IT personnel, businesses can opt for a predictable monthly fee. This allows for better budgeting and cost control, as well as access to enterprise-grade IT solutions at a fraction of the cost.

2.       Having 24/7 Monitoring and Support: MSPs operate around the clock to monitor and maintain their clients’ IT infrastructures. This approach makes sure that any potential issues are identified and addressed before they can escalate into a huge major problem. By having 24/7 support, the client can be assured that their systems are always up and running, minimizing down time, and maximizing productivity.

3.       Allows for Scalability and Flexibility: As the business grows and evolves, so will their technology needs. An MSP can offer solutions that can adapt to the changing requirements of businesses. Whether it's adding new users, expanding into new markets, or adding new technologies, working with an MSP will provide the flexibility to scale IT resources up or down as needed.

4.       Increased Security: Cybersecurity is more important than ever with the rise of cybercriminals. A good MSP employs industry-leading security measures to protect their clients from cyber threats such as malware, ransomware, phishing attacks, hackers and other data breaches. By using robust security protocols and staying ahead of emerging threats, an MSP can help businesses safeguard their sensitive data and preserve their reputation.

5.       Business Can Focus on Business Objectives: By outsourcing IT management to an MSP, the company leaders can focus on their core competencies and strategic objectives without being bogged down by IT-related issues. This allows for greater innovation and competitiveness in the market, as the business can spend more time and resources to driving growth and delivering value to their customers.

Managed Service Providers are changing business IT departments by offering cost-effective, proactive, and scalable solutions that enable businesses to stay ahead in today's digital landscape. By signing up with an MSP, a business has access to the expertise and resources of seasoned professionals to optimize their IT infrastructure, enhance security, and drive business success. As technology continues to change the MSP will continue to play a vital role in helping businesses navigate the complexities of the digital world and unlock their full potential.


Saturday, April 27, 2024

How to Integrate Microsoft Authenticator Into Your Company's Environment


In today's world, ensuring the security of your company's data and systems is of upmost importance. One effective way to increase your organization's security measures is by implementing multi-factor authentication also referred to as MFA.

Microsoft Authenticator is one of the main tools that adds an extra layer of security by requiring users to verify their identity using their mobile device.

In this guide, we'll walk you through the steps to seamlessly integrate Microsoft Authenticator into your company's environment.


Step 1: Review Your Current Security Setup

Before starting this process, you will need time to review and assess your company’s current security setup by making note of any authentication methods currently configured and set in place and then you will need to identify any potential weaknesses or areas for improvement.


Step 2: Set Up Azure Active Directory

Microsoft Authenticator integrates seamlessly with Azure Active Directory or also called Azure AD, which is Microsoft's cloud based identity and access management service.

If you have not already done so, you will want to set up Azure AD for your organization. You can search online for Microsoft's documentation for guidance on how to create and configure an Azure AD tenant. 

A simple overview of the process goes like this:

  • Sign into the https://portal.azure.com site
  • Select Microsoft Entra ID
  • Navigate to Identity > Overview > and select Manage Tenants
  • Click on Create
  • On the “Basics” tab, select the type of tenant you want to create.
  • Then select the Next: Configuration option to move to the Configuration tab
  • Complete the form on the screen by entering the company name in the Organization name field; the initial domain name, without the .com or anything; and then choose your country.
  • Click on the “Review + create” button and review the information you had entered, click the Create button to finish.

That’s it, you just created your tenant in Azure!  It should be noted that the account you use to create the tenant will be the first user account added to the domain and it will have full global admin access for management.  It is highly recommended that you have more than one global administrator account, at least two and five is often the most that is recommended.  Too many cooks spoils the meal or something like that!


Step 3: Enable Multi-Factor Authentication

Once you have created your organizations Azure Active Directory, the next step is to enable multi-factor authentication, typically referred to MFA, for your users. With Azure Active Directory, you can enforce MFA policies that require your users to provide additional verification when signing in. This can include methods such as SMS codes, phone calls, or the Microsoft Authenticator app. The Microsoft Authenticator app is often the best and preferred method to implement.


Step 4: Install Microsoft Authenticator

Instruct your users to install the Microsoft Authenticator app on their mobile devices. The app is available for both iOS and Android devices and can be downloaded from the Google Play Store or Apple app store.


Once installed, users can very easily set up the app by following the instructions presented on screen.


Step 5: Configure Microsoft Authenticator

After installing the app, users will need to configure it to work with their account. This process is simple and involves scanning a QR code or entering a code provided during the setup process. Once configured, users can use the app to generate verification codes when prompted during sign-in.


Step 6: Test the Integration

Before fully deploying Microsoft Authenticator across your organization, it is best practice to roll out solutions to a test group to thoroughly test the integration to ensure everything is working correctly. Have a select group of users test the process and provide feedback on any issues they encounter.


Step 7: Roll Out to Your Organization

Once you have fully tested and are confident in the integration and have addressed any issues that were reported during testing, it's time to roll out Microsoft Authenticator to the rest of your organization.

Users will be presented with a screen similar to the example below on the device they are signing into (on the left) and using the authentication app (on the right) they will enter the code and tap on ‘Yes’ to continue logging in.


Always communicate the changes to your users and provide them with any necessary instructions or training materials!  You can even copy/paste part of this article to use as your instructions.