Microsoft OneDrive is a cloud storage service that comes pre-installed with Windows 11. While it can be a easy tool for syncing and backing up your files, some people may prefer alternative cloud storage services or may not use cloud storage at all.
Removing OneDrive can free up system resources and declutter your system if you don't need or want to use it. For some users who do not prefer to have Microsoft OneDrive syncing their data to the cloud, I provide you with a few methods to remove it.
Removing Microsoft OneDrive from a computer running Windows 11 is a pretty simple process. Whether you want to uninstall it temporarily for troubleshooting purposes or permanently because you don't use it, there are several methods to accomplish this.
Method 1: Uninstall OneDrive via Settings
- Open Settings by clicking on the Start menu, then click on the gear icon to open Settings. You can also press Win + I as a shortcut.
- Navigate to Apps in the Settings window, select "Apps" from the options.
- Click on "Installed Apps."
- Search for OneDrive in the search bar under "Apps > Installed Apps" type "OneDrive" to locate the OneDrive app.
- Click on three
horizontal dots on the far right of the Microsoft OneDrive in the search
results to expand its options.
- You should see an "Uninstall" button. Click on it, and Windows will prompt you to confirm the uninstallation. Follow the on-screen instructions to complete the uninstallation process.
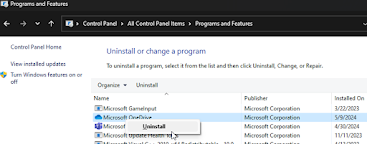
Method 2: Uninstall OneDrive via Control Panel
- Open Control Panel: You can open Control Panel by searching for it in the Start menu.
- Programs and Features: In Control Panel, click on "Programs" or "Programs and Features," depending on your view settings.
- Find OneDrive: Scroll through the list of installed programs to find Microsoft OneDrive.
- Uninstall OneDrive: Right-click on Microsoft OneDrive and select "Uninstall" or "Uninstall/Change" from the context menu. Follow any prompts that appear to complete the uninstallation.
Method 3: Uninstall OneDrive via PowerShell
- Open PowerShell: Right-click on the Start menu and select "Windows PowerShell (Admin)" to open PowerShell with administrative privileges.
- Uninstall OneDrive: In the PowerShell window, type the following command and press Enter:
Get-AppxPackage *OneDrive* | Remove-AppxPackage
- Verify Uninstallation (Optional): After the command completes, you can verify that OneDrive has been uninstalled by typing onedrive in the Start menu search. If OneDrive is no longer present, it has been successfully uninstalled.
Method 4: Disable OneDrive Integration
If you prefer not to completely uninstall OneDrive but want to disable its integration with File Explorer and other parts of Windows:
- Open OneDrive Settings: Right-click on the OneDrive icon in the system tray (near the clock) and select "Settings."
- Disable OneDrive: In the Microsoft OneDrive settings window, go to the "Account" tab and click on "Unlink this PC." Follow the prompts to unlink your PC from OneDrive.
- Disable Startup: To prevent OneDrive from starting automatically with Windows, right-click on the Taskbar, select "Task Manager," go to the "Startup" tab, find "OneDrive," right-click on it, and select "Disable."
By following these methods, you can remove Microsoft OneDrive from your Windows 11 computer according to your preferences. Keep in mind that some methods may require administrative privileges, and it's always a good idea to back up any important files before making system changes.


No comments:
Post a Comment
I appreciate the time that you have taken to visit and read my blog. Thank you to everyone who decides to leave comments. However, comments need to be as useful as possible to all of our readers and comments need to be respectful towards others. I reserve the right to remove any comments from the site.