Pages

Sunday, July 26, 2015

Slow computer?

If you have found that your computer has been running sluggish it might be time to do a minor bit of
Courtesty: openclipart.org
maintenance.  Over time your computer accumulates a lot of "stuff", some of it are documents and programs you have created or installed. However, sometimes it is "junk" that you pick up just from browsing online.

Here are some things you can do to help make your computer perform better.  This post will deal mostly with Windows.  If you are using OS X, check out this article from CNET explaining five tips to speed up your Mac.

First thing to do is scan and remove any malware and viruses that have worked their way into your computer.  A couple programs I would suggest is Malwarebytes and Avast antivirus.  Both programs are free, do their jobs well, and are available for both Windows and OS X.  Download and install each program, then launch them one at a time, perform a full system scan and allow the program to either remove or quarantine anything it finds.  If it requests that you restart your computer after, I would.  I would restart it even if it doesn't ask.

If you have a load of tool bars in your website, removing those completely will often speed up your web browsing and some toolbars may be removed through the malware scan.  If this happens, I wouldn't waste time reinstalling any of the toolbars.  Moving forward, any software installs that give the option for a custom install would be better installed this way.  Why?  Often you have the choice of not installing features that you don't actually need.  I always do a custom install on programs, even if I stick with the default settings I will know what it is doing.  Many times you are then given the option to not install that coupon toolbar when installing a program for doing my finances.  Sometimes you might need to re-run a malware scan after removing toolbars.

Change web browsers.  I never use or recommend the Internet Explorer browser that comes with Windows.  There are many other browsers than can do a better job and not be the number one target for malware.  Personally I use Mozilla's Firefox with some add-ons such as NoScript, which blocks clickjacking attempts, Java, Javascript and other executables from running.  If I need a website to load its scripts, I can click on it and choose to temporarily load them or if it is a site like my bank I can tell it to always allow.  Google's Chrome browser is another excellent option.

Open the computer and do a bit of 'dusting' on the inside.  It is not recommended to use a vacuum cleaner to 'suck' out the dust because it can cause static electricity to buildup and a static discharge can kill your computer.  My boss at a former employer zapped a fairly new motherboard when working on a computer because of static discharge.  Grab a couple cans of compressed air and blow out everything you can.  Underneath the motherboard and inside the power supply (from both directions) using that little tube that comes with the can, drive bays, the cables, the casing, everything.

If you have the money and use your computer for doing more than social media, email, finances, and other basic things. you could also upgrade things like the video card and the hard drive.  Newer technology in video graphics have brought us faster processing power and hard drives have grown in storage capacities and speed.  Today you can get a terabyte of storage space for around a hundred bucks and if you wanted to go with a fast hard drive there are the new solid-state drives (SSD) which  perform very well because they have no moving parts, however,the storage capacity isn't (yet) as large as a mechanical drive and the costs are still pretty higher - in my option - for what you get.

And lastly, try your best at keeping your computers software updated, both Windows and device drivers.  If you do most of these, you should find your computer performance being a bit better than it use.  There is one more option you can do if you don't mind basically starting over and that is to do a complete wipe and erasure of the hard drive and reinstalling Windows.  Only do this if you have done everything you can do to improve performance and nothing seems to work.  Save everything you can to re-writable CD/DVD if you can or create a Dropbox or Google Drive account and copy your documents and pictures there.  If after a wipe and reinstall your computer is still not working as good as you remember it and you can't live with it like that, it might be time for a new computer.

Sunday, July 19, 2015

Shopping for a Home Wireless Access Point or Router?


Is your Internet connection kind of pokey?  Have you just bought your first laptop or other wireless device and need a way to get online?  There are many ways of getting your devices online but the best way to do it is with a home wireless access point.  There are many options to choose from but what you want to buy should be based on what your devices can support and how much you are willing to spend.

Notice I keep saying devices and not computer(s).  The reason for this is because wireless access points can be used for more than connecting your computer and laptop to the Internet.  You can use it to connect your wireless TV, share a printer with other networked computers in your home, media streaming device (such as the Roku and Apple TV), gaming systems and more.

You need to determine what are the standards that your devices at home use.  Is it 802.11b (Fair),
802.11g (Good), 802.11n (Better), and 802.11ac (Best).  An easy way to determine in Windows what your computer has it to open the Control Panel > Device Manager and expand the Network Adapter section.  Double click on the network adapter to open properties and click the Advanced tab.  You'll see a screen similar to mine on the right, I've circled the areas where you can see the standards.  For my computer, it supports three standards - 802.11b/g/n.    On a Mac computer, press the Option key and click on the wifi icon in the menu bar.  It will show you a little more detailed information about your wifi connection, the information listed next to "PHY Mode" is what you are looking for.  For other devices, refer to your documentation or the company website to determine the standards it uses.  It is probably safe to say most devices are at least 802.11b/g.  Even if your computer has a lower standard rating there are ways of "upgrading" by buying a network adapter card.

You will need to determine what is it you are going to do on the Internet and how much money you are willing to spend.  Obviously the better the performance, features, speed, etc. the more it is going to cost.  Let's look at three options from the least expensive to the most expensive.  The basic function of each is pretty much the same no matter the cost.  They get you online either wirelessly or wired and have some web browser-based configuration page to make setup easy.


Netgear WGR614
If you are just going to be casually surfing, checking bank accounts, email, Facebook, maybe some
minor game play, or a little bit of movie streaming, then a router like an 802.11g would be just fine.  Check out the Netgear WGR614 Cable/DSL Wireless Router.  Has four Ethernet ports on the back to hardwire devices that either do not have wireless capability or you would rather have it benefit from the quicker wired speed.  It isn't anything fancy but will get the job done.  It can be found online for under a $70 on Amazon, at the time of this post.


Netgear R6300
If you are into streaming video (movies, tv series, etc) heavily, like to play World of Warcraft like a boss, then I would recommend the Netgear R6300.  This is the router I own.  I stream to at several devices in my home (four computers, three tablets, four Roku boxes, three Android cell phones, and one PlayStation 4.  I also needed the ability to stream at a decent rate when not at home on whatever devices I can stream through. Whether it is a cell phone or Chromecast the ability to stream without slowness or buffering was important.  The Netgear R6300 is one of the near top of the line products, I do believe there are several that are even better BUT for what I wanted and need it to do, it has worked perfectly. This one costs under $140 on Amazon, at the time of this post.

Both of the above routers and the majority of other routers include built-in firewalls, to prevent people on the Internet from gaining access to your computer.  Most also incorporate a small number (usually four) of network ports to directly connect a device that either doesn't have wireless ability OR you want to hard wire for better speeds.  These ports are generally always faster than wireless because unlike wireless a hard wired (directly connected) device does not have to share the bandwidth (speed) with other connected devices.  The WGR614 has four 10/100 ports and the R6300 has four 10/100/1000 ports - yes that is a gigabit connection!  Another note, like wireless, the computer has to have hardware that supports gigabit Ethernet, if it doesn't then it will only run at 100 Mbps.  Again, most computers have the ability to upgrade their Ethernet cards, even if yours is built into the motherboard a gigabit network adapter card could be purchased and installed.


Asus AC2400
If you are one of those people who need to have the biggest, best, fastest thing out there.  Then might I interest you to the Asus AC2400 RT-AC87U Dual-band Wireless router.  This router boasts a whopping 2333 Mbps in bandwidth speed - making it one of the fastest home wireless router on the market and it is shaped rather nicely, compared to the typical rectangle shape of other routers.  It also claims to have the ability to help prevent malware and viruses from infecting your computer.  Check out this c|net review if you want to learn more about it!  It does not come cheap though!  At the time of this post, it could be bought on Amazon for $238.00!


Sunday, July 12, 2015

How To Reset Your Windows Password

If you have forgotten your log in password for your Windows computer, fret not there are a few things you can do to get back in.


Clean Install Windows in 15 Easy Steps
This is more of a last resort option, completely wipe your hard drive and reinstall Windows.  Obviously, you would want to backup your data but if you can't log in this poses a bit of a challenge.  It can be done though with an inexpensive external USB hard drive enclosure and another computer.  Simply turn off your computer, remove its hard drive, insert it in the enclosure (following the instructions) and connect it via USB to another computer.  You can then browse the drive the same way you would any other USB jump drive and copy off documents, pictures, etc. that you want to keep.  Once done, put the drive back in the computer. 
  1. Boot from you Windows 7 DVD
  2. Once Windows Setup loads, you can choose your language, time and currency format, and
    keyboard or input method.  Once selected, click on Next then click on "Install now" on the screen following.
  3. Click the check box to accept the license terms for Windows.
  4. When prompted for a type of installation you want, choose Custom.
  5. When asked where do you want to install Windows, click the "Drive options (advanced)" link on the lower right of the dialog box.
  6. You want to delete all of the partitions shown, click on a disk partition and then click the Delete link.  Just a reminder that once you delete a partition, there is no undo or change of mind.
  7. You now should only see one "Disk 0 Unallocated Space", click on it to select it and then click the Next button.  No need to create any partitions, Windows setup will do this for you.
  8. Windows will now install itself.  Depending on the speed of your computer and how big your hard drive is, this could take quite some time.
  9. Eventually, you will be shown a Setup Windows dialog box and it is asking for you to type in a user name and a computer name.  Fill in both boxes with the information you want then click next.
  10. On the next screen, type in a password.  Since the last password was forgotten, you might want to include a password hint - notice how it is a required field!
  11. On the next screen it asks for the Windows Product Key, this is often found on a label underneath or on the back of the computer .  It looks something like this:
    ABCDE-FHGIJ-KLMNO-PQRST-UVWXT
  12. Choose the way you want your computer to handle updates.  Suggest clicking on the recommended settings.
  13. Select your time zone from the drop down menu and adjust the date/time if needed then click next.
  14. On the location of your computer, most likely you are doing this at "home" (even if you are doing it at a friend's house, it is still considered "home") so click on Home Network.  If Windows prompts for setting up a homegroup, you can skip that for now.
  15. Windows setup will do a little housekeeping, and then voila! you are at the desktop.  If you enabled automatic updates back in step 12, it will begin to prompt you about downloading and/or installing them.  I would suggest doing the updates until there are none left.
Congratulations!  You have successfully reinstalled Windows. Only thing left is to install any printers or other accessories and install the software programs you want back on.


Clearing Your Windows Password
Another option you have, if you have access to another computer OR create it ahead of time, like right after reading about it for example, is to use a Password & Registry Editor.  This program will not change the password, it simply clears it so when you boot up your computer it lets you sign in without a password.  After which you can open the Control Panel and go to the User Accounts and add a password.  Again, I would setup that password hint to prevent having to do this again in the future!

  1. First thing we want to do is download the "Offline NT Password & Registry Editor" it is a free
    program and can be found here. You'll need to scroll down a ways.  There are two versions to pick from, one is to make a bootable CD and the other is for using a bootable USB drive.  Choose the one you want to use and scroll the site down a little more and it will instruct you on how to create the bootable media.
  2. Restart the computer and boot from your newly created bootable media.
  3. When the program loads and you see "boot:" on your screen, press the enter key.  If Windows loaded, you didn't boot off your bootable media correctly, restart the computer and try again.
  4. After a bit of information gets shown on the screen, none of which you have to be concerned about as it is just showing you what the program is doing as it starts up, you will be prompted to "Select partition by number."  Most likely you can just press enter to accept the default partition.  If you have more than one hard drive or have multiple partitions, you will need to type the number for the partition that Windows is installed on.
  5. Next it will ask to confirm the location of the Windows Registry.  Most likely the default location that it finds is correct, so press Enter to continue with the default path of Windows/System32/config.
  6. When asked to "select which part of registry to load", choose 1 to reset the password.
  7. Then when it asks "What to do" after it "Loaded hives" you want "1 - Edit user data and passwords" then press enter.
  8. You should now see a list of users from your computer.  Type the username to change and press enter.
  9. When the User Edit Menu appears, type 1 and press enter to clear the password.
  10. The password should now be cleared.  Type ! to quit editing the user and press enter.
  11. Type q to quit. and then answer Y to the "Step FOUR: Writing back changes" prompt to save the changes.  
  12. You should then see an "***Edit Complete***" message on the screen.  Press enter to answer no to the "New run?" prompt. 
That's it, all done.  You can reboot your computer and be able to login without a password.  IF you were the only person to use the computer then Windows will boot directly to the desktop, otherwise click on your username from the login list and it will sign you in without a password.  Now would be a good time to set a password and put a hint in just in case you forget in the future.

Sunday, July 5, 2015

How to Lock Down Your Child's iPad - PART TWO

In this segment, I'll go through how to use Apple Configurator to lock down your child's iOS device.  There are is an advantage to using Apple Configurator to using the devices Restrictions settings.  Apple Configurator is available, at this time, only for OS X so you will need to own or have access to a Mac computer with one free USB port - desktop or laptop does not matter.  It can be downloaded through the Apple App Store.  Be advised Apple Configurator will completely erase the iPad in order to supervise the device.


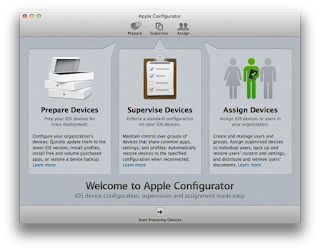
Launch Apple Configurator for the first time and you are greeted with the following screen giving
you a brief description of each section of the program.  For locking down your device you'll stick with the first two sections: Prepare Devices and Supervise Devices.  When you are ready to continue, click on the arrow at the bottom middle to "Start Preparing Devices."  This screen only appears the first time launching the program.


Let's first explore the Preferences, click on Apple Configurator from the top pull down menu and then select Preferences from the menu.  You will be greeted with the following screen.  I would recommend unchecking both boxes to prevent Configurator from making changes to the device should you connect it later on down the road.


Click on the Lock Screen tab at the top of the preferences  box and you are given a couple options of how the lock screen will appear.  Here you can add your own custom wallpaper if you like.  Find an image on your computer, using Finder, click once on the image to select and drag and drop to the image location in the preferences panel.  You can also choose to show the name of the device on the lock screen by select the proper radio button on the left side of the panel.  When you are done, click the red circle in the upper left corner of the Preferences panel.


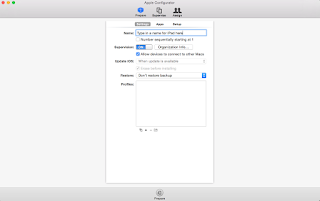
 You are now on the Prepare tab of Apple Configurator.  There are a couple more settings to make before processing your iPad.  First at the top of the screen you can type a name for the iPad.  (Ex. Mac Morrow's iPad)  Click on the toggle button next to Supervision.  Then you can click on Organization Info and fill in the blanks with your personal contact information.  This information is stored within the iPad and could potentially be used by someone who finds your lost device in returning it.  Next you will want to click the + sign at the near bottom middle of the screen and then select "Create New Profile" from the mini dialog box.


On this screen you will need to first type a name for this profile.  Using "Restrictions", without the quotes, is a good enough name.  But you can type anything you want that will help you remember what it is.  Organization, Description, and Consent Message are all optional fields and can be skipped.  In the Security section, I would suggest changing it to "With Authorization".  This causes a "Authorization password" box to appear where you can type in a password that is easy for you to remember.  It would be needed should you ever decide to remove this profile.  Leave "Automatically Remove Profile" set to 'Never'.


On the left side of the screen you will see a LOT of choices.  Every section could potentially be configured and applied to the iPad from restriction settings, to adding your home wifi network credentials, to email settings.  For this article, we are only to going to look at Restrictions.  I would suggest checking out Apple's Configurator help page.  Click on Restrictions and then select Configure on the right side.


Here you are now given three tabs of settings that you can toggle to allow or disallow, by clicking on a check box.  If you want to, for example, not allow your child to install apps, then you would uncheck the box "Allow installing apps."  Just remember, to allow the Apple App Store and installing apps you will have to remove the profile and then connect the iPad to the computer and re-apply the profile when ready to remove the Apple App Store.  Browse through the three screens and make any setting adjustments that you want.  I would recommend NOT setting a rating for apps.  Doing so will prevent apps with no rating by the developer from being used from working.  When you feel you are done click the 'Save' button.


Your screen should look similar to this example.  You now have a Restrictions profile!  Connect your iPad to the computer using its USB cable from the charger.  When Configurator recognizes it a little number will appear on the Prepare tab icon at the top of the screen indicating how many devices are currently connected.  Leave the profile unchecked for now and click on Prepare at the bottom of the screen.  The program will erase the iPad, update the operating system to the most current version and when it is finished you will see the number now appears on the Supervised tab.  If it doesn't, the most likely culprit is the supervision toggle is off.  No fret, turn it on and then click Prepare at the bottom of the screen again.  Click on the Supervise tab and keep the iPad still connected.


You are almost done!  On the supervise tab, notice it has some of the same options as the prepare tab has.  Make no changes here.

When you are ready to, click on the check box next to Restrictions in the Profiles box to select it.  Then click the "Refresh" button at the bottom of the screen.

Depending on what features you disabled (iMessages, App Store, etc.) you will see those apps disappear from the home screen of the iPad when the process completes.


BONUS MATERIAL:
Did you notice the tab called "Apps"?  There is a way to add apps to the iPad without turning on the App Store again.  If you click the Apps tab and then click the + sign, this will open a navigation window.  Browse to your iTunes folder in a location similar to the following:

Mac HDD > Users > Your User Name > Music > iTunes > iTunes Media > Mobile Applications

You will, if you have downloaded apps before, see a list of apps.  Click on the app or apps that you want to add.  Note:  Apple Configurator cannot do paid apps without you having an Apple Volume Purchase Program account.  VPP is normally used by education and business, I do not know if a regular consumer can sign up for it.  Feel free to try if you want, by clicking this link to Apple.  Paid apps are shown in the list an oval with a number inside.  The number would indicate how many licenses you have bought, zero is default because you would have to add the license(s) to the program.  Free apps can be installed now.  Just click on the check box next to the app(s) that you want to install and when ready click "Refresh" at the bottom of the screen.  Depending on the number of apps and the sizes the process can take just a couple of minutes to well over an hour!!