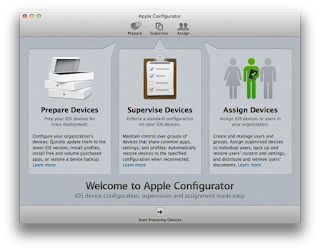
 Launch Apple Configurator for the first time and you are greeted with the following screen giving
 you a brief description of each section of the program. For locking down your device you'll stick with the first two sections: Prepare Devices and Supervise Devices. When you are ready to continue, click on the arrow at the bottom middle to "Start Preparing Devices." This screen only appears the first time launching the program.
Let's first explore the Preferences, click on Apple Configurator from the top pull down menu and then select Preferences from the menu. You will be greeted with the following screen. I would recommend unchecking both boxes to prevent Configurator from making changes to the device should you connect it later on down the road.
Click on the Lock Screen tab at the top of the preferences box and you are given a couple options of how the lock screen will appear. Here you can add your own custom wallpaper if you like. Find an image on your computer, using Finder, click once on the image to select and drag and drop to the image location in the preferences panel. You can also choose to show the name of the device on the lock screen by select the proper radio button on the left side of the panel. When you are done, click the red circle in the upper left corner of the Preferences panel.
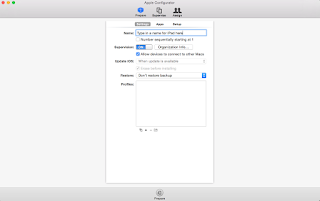
 You are now on the Prepare tab of Apple Configurator. There are a couple more settings to make before processing your iPad. First at the top of the screen you can type a name for the iPad. (Ex. Mac Morrow's iPad) Click on the toggle button next to Supervision. Then you can click on Organization Info and fill in the blanks with your personal contact information. This information is stored within the iPad and could potentially be used by someone who finds your lost device in returning it. Next you will want to click the + sign at the near bottom middle of the screen and then select "Create New Profile" from the mini dialog box.
On this screen you will need to first type a name for this profile. Using "Restrictions", without the quotes, is a good enough name. But you can type anything you want that will help you remember what it is. Organization, Description, and Consent Message are all optional fields and can be skipped. In the Security section, I would suggest changing it to "With Authorization". This causes a "Authorization password" box to appear where you can type in a password that is easy for you to remember. It would be needed should you ever decide to remove this profile. Leave "Automatically Remove Profile" set to 'Never'.
On the left side of the screen you will see a LOT of choices. Every section could potentially be configured and applied to the iPad from restriction settings, to adding your home wifi network credentials, to email settings. For this article, we are only to going to look at Restrictions. I would suggest checking out Apple's Configurator help page. Click on Restrictions and then select Configure on the right side.
Here you are now given three tabs of settings that you can toggle to allow or disallow, by clicking on a check box. If you want to, for example, not allow your child to install apps, then you would uncheck the box "Allow installing apps." Just remember, to allow the Apple App Store and installing apps you will have to remove the profile and then connect the iPad to the computer and re-apply the profile when ready to remove the Apple App Store. Browse through the three screens and make any setting adjustments that you want. I would recommend NOT setting a rating for apps. Doing so will prevent apps with no rating by the developer from being used from working. When you feel you are done click the 'Save' button.
Your screen should look similar to this example. You now have a Restrictions profile! Connect your iPad to the computer using its USB cable from the charger. When Configurator recognizes it a little number will appear on the Prepare tab icon at the top of the screen indicating how many devices are currently connected. Leave the profile unchecked for now and click on Prepare at the bottom of the screen. The program will erase the iPad, update the operating system to the most current version and when it is finished you will see the number now appears on the Supervised tab. If it doesn't, the most likely culprit is the supervision toggle is off. No fret, turn it on and then click Prepare at the bottom of the screen again. Click on the Supervise tab and keep the iPad still connected.
You are almost done! On the supervise tab, notice it has some of the same options as the prepare tab has. Make no changes here.
When you are ready to, click on the check box next to Restrictions in the Profiles box to select it. Then click the "Refresh" button at the bottom of the screen.
Depending on what features you disabled (iMessages, App Store, etc.) you will see those apps disappear from the home screen of the iPad when the process completes.
BONUS MATERIAL:
Did you notice the tab called "Apps"? There is a way to add apps to the iPad without turning on the App Store again. If you click the Apps tab and then click the + sign, this will open a navigation window. Browse to your iTunes folder in a location similar to the following:
Mac HDD > Users > Your User Name > Music > iTunes > iTunes Media > Mobile Applications
You will, if you have downloaded apps before, see a list of apps. Click on the app or apps that you want to add. Note: Apple Configurator cannot do paid apps without you having an Apple Volume Purchase Program account. VPP is normally used by education and business, I do not know if a regular consumer can sign up for it. Feel free to try if you want, by clicking this link to Apple. Paid apps are shown in the list an oval with a number inside. The number would indicate how many licenses you have bought, zero is default because you would have to add the license(s) to the program. Free apps can be installed now. Just click on the check box next to the app(s) that you want to install and when ready click "Refresh" at the bottom of the screen. Depending on the number of apps and the sizes the process can take just a couple of minutes to well over an hour!!


No comments:
Post a Comment
I appreciate the time that you have taken to visit and read my blog. Thank you to everyone who decides to leave comments. However, comments need to be as useful as possible to all of our readers and comments need to be respectful towards others. I reserve the right to remove any comments from the site.