Pages

Saturday, December 12, 2015

HELP! I'm STILL out of storage space on my iPad!!

This is a follow-up article to my previous post "Help! I'm out of storage on my iPad!".  When iOS 8.1 was released it introduced a new feature when you delete pictures and videos they are moved to a "Recently Deleted" section in your devices Gallery app. Where they remain for 30 days and then they are automatically removed or you can manually delete them sooner.


There is a bug in iOS where sometimes deleting your pictures and videos, including removing them from the Recently Deleted section does not free up space on your device.  One can spend quite a bit of time removing apps, restarting the device, etc., to no benefit.  So how do you recover the space?  You could go to the extreme of wiping the device but try the following first.

  • Go to Settings > General > Date & Time
  • Disable Set Automatically
  • Tap on the current date & time and roll it back 2-3 years
  • Tap General in the upper left and then press the Home button
  • Launch the Photos app and go to the Recently Deleted album (even if it says there are 0 photos)
  • Is it full of photos? If so, delete them!
  • Go back to Settings > General > Date & Time and turn Set Automatically back on

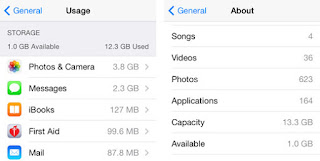
You can now open Settings > General > About and check what it says the free space is.  Keep checking back and you may find the free space keeps increasing!  I recently looked at a fellow co-workers iPad Air which started out with 0 MB of free space and within minutes of completing these steps the iPad had 7.4GB of free space!


Saturday, November 21, 2015

OS X Basics

Source: www.lewebinformatique.fr
I am sometimes asked to give some basic help with Mac computers and I've come up with this short list of items that may help some be a little more familiar with their computer.  This is by no means a know all, tell all post or comprehensive list of all features or even highly detailed explanation of the topics covered but will provided a little "oh ok" moments.


System Preferences

System Preferences is where you go to adjust user and system settings, it is somewhat similar to the Windows control panel.  System Preferences is divided into four or five separate rows, each row is a different category.

Source: www.macworld.co.uk
The first row are preferences that usually affect settings for the active user signed in.  Here you can adjust settings for the screensaver, language, security, notifications, etc.

The second row are hardware settings.  Here you can adjust display settings, energy settings, install or remove a printer, etc.  Since these settings affect every user it requires an administrator password to make changes.

On the third row are preferences used to configure various network and internet services and settings.  The settings here affect either just the active user such as iCloud and Internet Accounts or all users such as network and sharing which require ad administrator password to make changes.

The fourth row settings are system wide settings and will require an administrator password, here you can add or delete other users for the computer, change the date/time settings and enable or disable accessibility options.

On a few occasions there may be a fifth row of settings.  These are preferences provided by third-party developers for their specific apps, such as Flip4Mac or Adobe Flash.

If you need help trying to figure where something might by, there is a search bar in the upper right corner of the System Preferences box where you can type a basic idea of what you want and by entering text in this field will automatically highlight possible preferences you are looking for.

On some screens you will notice a pad lock in the lower left.  When it is 'locked' it means no changes can be made.  To 'unlock' it and make changes, click on it and enter the administrator password when prompted.  Some settings remain locked even when signed into the computer with an administrator account.  It helps prevent accidental modifications to the computer or program(s).


System Information

Source: support.apple.com
If you need to know some information about you computer, the system information box will show you.  Click the Apple logo in the upper left corner of your screen, and then select About This Mac.  The version number, processor information, and amount of memory is shown on this screen.  You can click on the version number multiple times to view the system build number and the hardware serial number.  Clicking on the More Info button, reveals even more info!

On this screen, you can see four tabs at the top of the dialog box: overview, display, storage, and memory.  Each of these tabs shows some more detailed information just on that selection.  Clicking the System Report button, produces a report of critical system details.  You can export this information for printing or later viewing by choosing File from the top menu bar then Export As Text from the menu bar.


User Accounts

There are a few different user accounts in OS X: standard, administrative, guest, sharing-only, and the root account.  The standard account is what Apple suggests most people should use for the daily use of their computer because this account is not allowed to make changes to system-wide preferences, system files, or anything which might affect another user's account.  OS X Mavericks brought an exception to the rule of allowing installing and updating items from the Mac App Store and for doing system updates.  As a parent with children, you can enable Parental Controls to restrict usage the Mac App Store and updates.

Administrative accounts are similar to the standard user, only they are part of the admin group and are allowed full access to almost all applications, preferences and system files.  Administrative accounts can install and run any program as long as they authenticate when the installer asks for authorization.

Guest accounts are disabled by default but can be enabled to allow non-authenticated file sharing access or local login access.  Anyone with access to the computer can use it to log in.  When the user logs out, the home folder is removed including any web browsing history.  Each time the guest user is logged in, a whole new home folder is created.  If you use the Find My Mac feature, it will enable the guest account since OS X uses login accounts it will allow the would-be thief to access the computer and get it online with the hopes that the owner will be able to access Find My Mac to locate it.

Sharing-Only account is a special user account which has access only to shared files and folder, there is no home folder and it cannot log into the computer. And finally, the root account has unlimited access to everything on the computer, it can read, write, delete, modify any setting and install any software.  The default settings for OS X do not allow any user to login as root.


Keychain Access

Keychain Access is where OS X keeps all your passwords, certificates, keys, website forms and secure notes in encrypted storage.  Every time you allow the system to remember a password or any other sensitive item, it saves it to the keychain system.  Only your account password is kept separate from the keychain..


Target Disk Mode

Macs have a unique ability of being able to share its internal disks without having the computer actually signed in.  Because this is something built-in the computers hardware, you can perform this on a Mac with a corrupt OS which won't boot as a means to retrieve data.  You can do this using a thunderbolt or firewire cable, depending on what your computer is equipped with.

To setup Target Disk Mode, connect the cable to the two computer and the Mac you want to copy files to (Mac A) powered on and logged in, press and hold the T key on the other Mac (Mac B) until the screen turns gray with a floating "symbol."  Open Finder on Mac A and under the devices section Mac B should appear as an external drive.  Copy what you need and be sure to eject the Mac B when finished.


Keyboard Shortcuts

One of the many questions I am often asked about are what are the keyboard shortcuts on a Mac.  A few of the most used shortcuts for the Windows user trying to use a Mac are, and as with Windows they work on supported programs:

  • Command + X to cut the selected item(s) on screen to the clipboard
  • Command + C to copy the selected item(s) on screen to the clipboard
  • Command + V to paste the previously selected items from the clipboard to the current application
  • Shift + Command + Z is the undo previous action
  • Command + A selects all items on screen

There are a couple ways of taking screenshots on a Mac that, in my opinion, is better than Windows.  In Windows to get a screenshot, you basically have to tap the "prt sc" button on your keyboard to take a screenshot and then you have to paste it into another program, like Paint, to save it as a file. OS X steps up a bit and saves the screenshot directly to your desktop as a PNG file!

  • Press Command + Shift + 3 to take a screenshot of your entire desktop.  If you have more than one monitor, it will take a screenshot of both monitor displays and saves each monitor display as its own PNG file.
  • Command + Shift + 4 + Mouse Selection will take a screenshot of only what you have selected with the mouse.
  • Command + Shift + 4 + Spacebar will take a screenshot of just the active window or program you are in.  Hover your mouse over the program windows to highlight it and then click the mouse button.

For a more detailed list of keyboard shortcuts, check out Apple support's list by clicking this link.


Saturday, November 14, 2015

How to Lock Down Your Childs Android Tablet


Android's version of Single-App Mode, known as Screen Pinning
(Android 5.0 Lollipop)

By using Screen Pinning, you can lock an app open so your child or any other person cannot exit or change without knowing a PIN number, which you set. 

To enable this feature:
  • Open Settings on your tablet
  • Open the Security options
  • Scroll to the Advanced section and depending on your device choose "Pin windows" or "Screen pinning."
  • Tap on the slider in the upper right of the screen to enable the feature.
  • Open the app you want to "lock" open for your child to use.
  • Tap on the designated button on your tablet that shows all the running/open apps, then slide the current app up until you see the "push pin" icon in the lower left of the screen.
  • Tap on the push pin icon.
  • A dialog box asking if you want to turn on Pin windows and how to disable it will appear. 
  • Choose "No, thanks" to cancel or "Start" to use.

I would recommend enabling a PIN or use Fingerprint access for the ability to disable screen pinning, otherwise it will display on the screen how to get out of it.  If you don't have this option, it is most likely because you don't have a passcode of some sort which unlocks the device when the tablet is powered on or awaken from sleep.


Enable the Guest Account
(Android 5.0 Lollipop)
The guest account is an account that has very limited access and is completely disposable.  Unlike actually setting up another user for the tablet and restricting those settings, the guest account will
  • Open Settings on the tablet
  • Open the Users option
  • Tap on Guest
  • The tablet will immediately switch users, your work in progress and activities are not altered by this, process the mini-setup functions, 
    • you can either sign-in a Google account when prompted or click Skip.
    • type in a user name if you want
  • Once the mini-setup is completed, the tablet will load to the home screen.
When you no longer need the Guest account, go back to the Users options in Settings and tap on "Delete guest profile."  This will delete the profile, along with all downloaded applications and data.  Once deleted, the data from the guest profile cannot be recovered.  The tablet will return control back to the primary user account.


Thursday, October 29, 2015

Greetings to my blog friends!


Greetings to my blog friends!

As this blog was created to be a part of my renewal process for my CompTIA A+ce certification, I would like to hear from you on some ideas or questions that you have and I'll gather your comments as future blog entries!

Leave your idea or ideas in the comments below or fill out the contact me section on the right! 

Thank you ALL for your support!!
Jim

Wednesday, October 14, 2015

Need more memory!!!

Adding memory to your computer is one of the easiest things you can do to your computer or laptop that can improve performance.  Some computers (such as netbooks) have integrated memory or built-in memory.  Most of the following describes the steps to take with a Windows-based computer.  iMacs and MacBooks can be upgraded as well following some of the steps below.  Be advised that not all computers have replaceable memory and some computers can only use a certain amount of memory - determining that amount is beyond the scope of this blog due to the wide variety of computers and laptops on the market. 


 First thing you will need to do is find out how much memory is currently in your computer.  Easiest way to find this out is to open the Control Panel and navigate to System.  Once in the System panel, you'll be shown some basic information regarding your computer.  As the example to the right shows, this computer has 6 GB of memory.

Next you need to find out if there are any empty memory slots inside the computer to add more memory to.  If there isn't an empty slot, not too much of a problem you can replace the existing memory with new modules.  This involves opening the case of your computer or a panel on a laptop, a phillips screwdriver is most likely all you need to complete this task.


Look at the existing memory and normally the memory will have a label on it that describes how much memory the module contains and what the speed and type of memory it is.  You can also go to some websites that can help you determine the type of memory is in your computer, one such website is Crucial.com. (You may or may not need to remove one module.)


Once you have identified how much and the type of memory your computer has, you can decide if you are going to add memory to the computer or replace the existing memory.  If your computer has 4GB of memory as one module, then buying another module of the same kind will double your memory!  Or you can replace both modules - really the choice is yours!

Where to buy your memory?  You can purchase the memory at your local computer/electronic store, such as Best Buy or online at Amazon, Newegg, etc.  Do your homework first on prices before purchasing, as you often can find the pricing varies!

Saturday, September 19, 2015

HELP! I'm out of storage on my iPad!!

Image source: http://cdn9.howtogeek.com

I am often asked, "my iPad is telling me I am out of free space, what can I do to get more?"  Unlike most Android tablets which have an SD card slot for expanding storage, the iPad does not have one.  Sure you can buy the 5-in-1 camera connection kit but really who wants have a gadget sticking out the bottom of their device?

So what can you do?  To start off, delete apps you no longer use or need.  This is as simple as browsing your home screens, tap and hold on an app until it begins to wiggle and then tap on the x in the corner of the app to remove. 

If, after removing unwanted apps, you still do not have enough free space.  Open SETTINGS > GENERAL > USAGE > MANAGE STORAGE.  This will show a list of items from the largest storage hog to the smallest.  Often I see, as in this example, "Photos & Camera" taking up the most space.  Often several gigs of data is used.

You have a couple options for fixing this!  The first, delete some pictures and videos.  I'd start with videos first, they generally take up more space than pictures do. 

Another option, the solution I use and recommend, is to create a  Dropbox account, download and install the app from either the Google Play store or Apple App store, then enable automatic Camera Uploads in the Dropbox app settings.  I do this on my cell phone and my tablet.  Soon as I take a picture or record a video, it gets uploaded to a "Camera Uploads" folder in Dropbox automatically. 

Image source: Dropbox.com
Don't be too concerned that you start with 2GB of data.  They offer many ways to obtain FREE storage increases and sometimes run 'special' promotions.  For example, in 2012, they would increase your storage by having camera uploads turned on and at the time the more pictures you uploaded within the designated timeframe you would get more storage.  The promotion had a limit of 4.5 GB of storage, which is still a lot of pictures!  By the time the promotion was done, I had increased my storage space to 6.5 GB.  You can also refer friends and when they sign up you earn a bonus 125 MB per friend.  Sometimes the device you use to sync to Dropbox can give you an unexpected bonus.  My Galaxy S Tab when I activated Dropbox on it, gave me a whopping 50 GB of additional storage space!  I currently have 56.5 GB of cloud storage to use in any way I want and didn't have to spend a penny for a premium account.  Of course, you can upgrade to a paid plan and get a whole lot more storage - at the time of this post, you can get 1 TB of storage for under $100 a year.  Another nice benefit of this is you can browse your cloud storage, not just from your phone or tablet but also from any internet connected computer!  This is the solution I suggest and recommend and have been using it since 2011.  As another nice feature, you can also manually move many documents on your device to Dropbox.  Look for the "Open In..." icon to see if your app gives the option to save to another location other than the device.  In cases where there is not, you can always email the file to yourself.  This could be a long process if you have a lot of data to save.  You can even try connecting your iPad to iTunes and see if you can transfer files using it.
Image source: http://travelinlibrarian.info

Google Drive is another cloud storage solution that would also allow you to access your pictures and files from any internet connected computer.  With it, you would enable Backup & Sync from within Google Photos.  I am quite happy with Dropbox, and therefore I have not investigated Google's option thoroughly to be able to praise it enough to truly recommend.  Google Apps, might be a future post one day.

Now for more drastic measures!  If after you have done everything above to free up space and still need more, you could wipe the iPad and start it from fresh!  iOS 9 uses less space than previous versions did, which is good.  So going this direction, delete as many apps as it takes to get enough free space to upgrade.  Then update the iPad by going to SETTINGS > GENERAL > SOFTWARE UPDATE.  Go through the process by following on screen directions, it'll take a little while to download and install so be patient.  Once the iPad has finished the upgrade process, go back to SETTINGS > GENERAL and scroll the right side of the screen down to the bottom and tap on RESET and then select Erase All Content and Settings.  This will erase everything and the iPad will be back at factory settings.  Complete the initial setup of the iPad and sign into the Apple App store and reinstall the apps you want by tapping on the Purchased tab at the bottom and tap on the cloud icon next to the apps.  Don't forget to setup your Dropbox or Google Drive apps from the start so it will backup your data from the beginning!

Monday, September 7, 2015

Configuring a PLEX Media Server

As a follow-up to my blog, Cutting the Cable and Streaming Everything, this post will cover setting up your own Plex Media Server.

https://plex.tv/

Plex is a powerful and east to use media server you can install on almost any computer to host and playback your media.  Whether it is music, photos, television series, or movies - Plex has you covered!!


THINGS YOU NEED...

To begin you need a computer that will act as your media server.  Plex can run on a Mac, Windows, or Linux computer.  For playback, you'll need the Plex App for whatever device you wish to play your media library back on.  If you won't be streaming anywhere, you could go as bare as connecting your media server to your television and using Plex's web interface.  Going this route, I would recommend getting an inexpensive Bluetooth keyboard, such as the Logitech K400r.  This keyboard comes with the Bluetooth transmitter so if your computer does not have Bluetooth built-in, it will with this keyboard AND it has a built-in two button mouse trackpad so no separate pointing device is needed!  There are also Plex apps for Android, Chromecast, iOS, PlayStation, Roku, Xbox, and several others - you'll have to decide how you want to play/stream your media! 

The minimum requirements for the media server as Plex recommends is this:
  • Intel Core 2 Duo processor 1.6 GHz or better
  • At least 1GB RAM for Windows/Mac OS X
  • At least 512MB RAM for Linux
  • Windows: Vista SP2 or later
  • OS X: Snow Leopard 10.6.3 or later (64-bit)
  • Ubuntu, Debian, Fedora, CentOS or SuSE Linux
The recommended requirements for the media server as Plex recommends is this:
  • Intel Core 2 Duo processor 2.4 GHz or better
  • If transcoding for multiple devices, a faster CPU may be required
  • At least 2GB RAM
  • Windows: Vista SP2 or later
  • OS X: Snow Leopard 10.6.3 or later (64-bit)
  • Ubuntu, Debian, Fedora, CentOS or SuSE Linux

From my own experience, I would not recommend the minimum requirements.  It will work alright with those settings but often I would run into 'buffering' issues.  Don't let that discourage you though, give it a try with the computer you want to use. My media server consists of this (and only has a Windows Experience Index of 1):
  • Intel Pentium 4 processor 3.20 Ghz
  • 2GB RAM
  • 32-bit Windows 7 Professional
  • 3 hard drives:
    • 32GB primary drive - only Windows and the Plex server program are installed
    • 2 storage drives for media only
      • 2TB secondary drive
      • 3TB tertiary drive
What I found made my media server perform the best wasn't more memory or processing power, it was an upgrade to my network router!  Refer back to an earlier post titled "Shopping for a Home Wireless Access Point or Router?" and scroll to the middle of the article to the Netgear R6300 if you want to read more about my router.  Upgrading my router made all the difference in the world, my buffering issue are rare now, video playback is near HD quality - I keep the streaming quality at 4 Mbps, 720p for local.  Remote and Web playback quality is set at 1.5Mbps, 480p.


WHAT YOU DO NEXT...

Next you need to get your media in order.  This process can take a relatively short amount of time or a long time just depends on how much you have at the moment!

I am going to assume your media is all stored on DVDs.  To get them off of your disc and on your computer as a file, you'll need a DVD ripping tool such as Freemake Video Converter.  When you open this program, click on the DVD button and for what you want to convert the media to I have found the FLV files playback better than MP4, AVI, or MKV.  Especially when streaming to devices over the Internet.

After you have your media converted you need to setup folders and sub-folders and file names in a certain way for the media server to be able to index it properly.  Plex has a rather well documented section for the best way to do this.  You can find this information by clicking this link.  An example of how this should be structured, check out the following example pictures for sections on movies, music and television:

For movies:


For music:


For television:

Overview of all of the structure of all the main folders:

 As you can see each section has is its own folder (see the overview image immediately above) and within those sections is first a folder titled what it is (either a movie with the year it was released in parenthesis, television series, or in the case of music is the artist - album name).  The folder inside the first is either the name of the movie again with the year of release, the season of the tv series, or the name of the song.  The third level, is for television series, the files there are named by the show title followed by a series number and episode number.  For help on naming you can also refer to the Online TV Database, there you can find the season and episode numbers if you need it.

I highly recommend taking your time and getting this set up before moving forward.  There is a lot of up front work but once you get this done, any media you add after this will be simple and easy!!  When I first configured my Plex server I didn't know about the proper naming rules and went my own way about it.  I ended up with one confused media server when it came to television series.  Movies I got it right, I didn't have the year of release and that messed up a small number of listings. 


PLEX MEDIA SERVER...

OK, so you have your computer ready and now go to www.plex.tv, click on the downloads link at the top of the screen.  Click the "Computer" button for the Plex Media Server to go to the screen to choose your operating system and download the software.  Once downloaded, begin the installation program and follow the default settings.

 If Plex does not automatically launch when completed,  right click on the Plex icon in the system tray (down by the clock) and select Media Manager.  Since this is your first time opening interface the Plex Setup Wizard will appear.

So the basic setup happens.  It asks for some simple information at the start.  It wants you to name the server, connect your server to Plex to be able to access it when not at home.  And asks if you want to send any anonymous data back to Plex for helping improve the program.  

After this you are greeted with a screen to add a library.  Go ahead and begin! 
  1. Click the  Add Library button
  2. Choose the appropriate Library Type
  3. Name the Library if the default name doesn't suit you
  4. Click Next
  5. Click Add Folder
  6. Browse for the folder to add
  7. Choose Add once done
  8. Add additional folders if required in the same way
  9. If necessary, set the Advanced Options
  10. Once done, click Add Library
  11. The Library is created and the media found will be added to the database
If you need or want more information regarding Creating Libraries, click this link which will take you to a Plex article.

For now, skip Channels and continue with the setup wizard.  For more information on channels click this link.

Once the setup wizard has finished, the server will begin scanning your media and creating the Plex libraries.  Depending on how much media you have, this could take a matter of minutes or hours. 

 
Congratulations!!  You have a running media server with the capability to streaming to your cell phone, tablet, computer, from anywhere where you have an Internet connection.  For home use, I would recommend either getting a Roku box connected to your television.  See my article on Cutting the Cable and Streaming Everything to see how Plex is one of several things that can help you save money each month!

If you would like more detailed instructions, you can find that at Plex website by clicking this link

Saturday, August 22, 2015

Cutting the Cable and Streaming Everything

Are you tired of paying high monthly subscription fees to the satellite or cable company fortelevision?  If so, read on!

I often am asked if there are alternatives to satellite or cable television.  The answer is, yes... several.  The first alternative is to watch only OTA (over the air) television.  Depending on where you live, the financial impact of you wallet may be just a few dollars if you live in the city of Chicago, IL for a inside the home digital television antenna and possibly up to a hundred bucks or more if you live in rural Pittsburg, KS for an attic or outside mounted antenna.  Don't underestimate the digital OTA service, there are (depending on your location) quite a lot of stations broadcasting!  Last time I connected a digital antenna to my television and scanned for the channels in my area there were close to two dozen channels!

However, where I live I cannot have an attic mount or outside antenna and an inside antenna has to be power amplified antenna which picks up quite a few stations but not without distortions.  So I opted into to go to Internet streaming for television and here is what I did and the route I suggest when asked for options other than satellite or cable television.

I recommend using a Roku 3 and subscribing to a couple streaming services, such as Netflix, Hulu Plus and USTVnow.  All three streaming services can be subscribed to for less than $50 a month!  And if you don't want to spend a dime there are hundreds of free streaming services available on the Roku.  The Roku 3 has been out since 2013 and it is faster than the other Roku models, has a few more features and while it is currently in beta mode has a mirroring feature similar to Apple TV.  And while I don't make use of it, the Roku boxes also have games that can be added and the remote acts as a gaming remote - it reminds me of a Nintendo Wii remote.

For streaming services, I use USTVnow, Hulu Plus and Netflix.  I have found that Netflix is rarely used in our household, except by my son, so I'm tempted to cancel the service. USTVnow is an excellent website and channel for Roku.  While it is geared for Americans living abroad, I live in a far suburb community of Indianapolis and have never been abroad.  I've used their services for the past three years and have been very pleased with it.  Since a digital antenna doesn't perform well where I live they provide me for my "local" channels.  Ah, you ask..why'd he put that quotes?  Good question and the reason is, they are local if I lived in Harrisburg, Pennsylvania.  This doesn't bother me, it is the same television shows on their system as it would be if I were on an antenna only thing that doesn't apply to me is the news.  Along with ABC, CBS, CW, NBC, FOX, they also, for the same $29 a month (USD), provide some basic cable channels like AMC, History, Nickelodeon, Animal Planet, Cartoon Network, etc.there are twenty-five channels all together for a little over a dollar per channel a month.  And if you are ever away from home, you can use your smart phone, laptop, or tablet to sign into the website and still watch your programming - if you want.

I won't really go into details on Netflix and Hulu Plus because they are pretty well-known services.
Both cost, at the time of this post, $7.99 a month (USD) and each contain a pretty decent library of movies and television shows.

Lastly, I have my own media server running the PLEX media system on an old Dell Optiplex
computer.  With this system I have converted my large DVD library into media files on the computer that I can stream to all four of my Roku boxes, my tablet, gaming consoles, and cell phone.  Meaning I can watch a movie or listen to my music from anywhere with a decent wifi connection or use my data on my cell phone if there is no wifi available.  I won't go into much more on this and will instead make it a future blog post!

All streaming services, of course, require internet access from home.  Whether you keep the cable just for its high speed broadband service or live close enough to be able to use DSL or even better live in a location to get Fiber To The Home (FTTH) you will need the internet.

You might wonder why I didn't speak much of or don't recommend the Apple TV.  This is all personal opinion, but in my experiences with Apple TVs over the last three years I find them not reliable and too closed.  Straight out of the box you don't get a "channel store" so the only channels you get is what Apple wants you to have.  I haven't tried, but I've read that if you 'jailbreak' an Apple TV not only do you void its warranty but you can then add channels that aren't 'stock'.  The Apple TV is also slow to respond and its interface is a rather bit clunky.  The remote is very basic and very small = easy to misplace.  The remote also uses infrared, so you have to point it directly at the Apple TV, where on a Roku the remote uses radio freqency and I can take the remote to the master bedroom closet (about 60 feet away) and still change channels.  Also means I don't have to hold the remote and point it at my Roku.  It'll be awhile before I am sold on an Apple TV.

Saturday, August 8, 2015

What do you do with old computers?

You've got a new computer, now what do you do with that old one?  Luckily there are a few options for those who are looking to dispose of an old computer!

You could hand it over to your child/children to use and then setup some rules and guidelines for your younger children on proper use of the computer, Internet safety if you so desire to connect to your home network, install their favorite game(s) for fun, and have it setup so they can use it for their homework when needed.  My child, when in elementary school, every once in awhile needed to use his computer for homework - even when he was in second grade.  Of course, remove any programs or saved files of yours that you don't want your children to have access to. 

Image source: ubuntu.com
What I usually do is sell it on eBay!  You should completely erase your hard drive and install a fresh operating system going this route.  If you provide the computer with Windows you will have to be sure to include the proper product key and/or COA.  Before I sold my computer I would download the Ubuntu operating system, which is a free Linux-based OS, have it reformat my hard drive, repartition it and then install the operating system.  You may or may not make a lot of money from selling it but a $100 or more isn't too shabby for some extra spending money.  Also make sure you include any documentation the new owner might need, especially if you create a temporary "administrator" account and password protect it.  Nothing would annoy your buyer more than powering on their new-to-them computer and can't login due to a password.

Another option you can do is recycle it.  There are many businesses out there you can take your computer for recycling and some do it for free and some may charge a small fee.  Go to your favorite Internet search engine and search for "computer recycling near me" for a list of locations.  I haven't used a recycling program for a computer so I can't really recommend a specific company and since this is a blog that is viewed my an audience in multiple countries it doesn't seem to make sense for me to recommend one when it might not be available to someone in Germany.  I will recommend if you are a person who is very concerned about someone else accessing your old data.  Yes, even if you reformat your hard drive it is still possible to recover some old data, unless you use programs specifically created to securely wipe the drive. 

I have seen suggestions in the past where you can
Image source:.mypctechs.com
open your computer case, remove your hard drive and if you have a drill put two or three holes in it - making sure to completely through it. This will guarantee, unless the NSA gets a hold of it, no one is going to access that data!  Yes it is pretty extreme, but for those who have a LOT of concern about it, this will take care of all the concerns.  Doing it this way, you don't even need to bother erasing it.  Then you can send your computer off for recycling and have a good night sleep.


Sunday, July 26, 2015

Slow computer?

If you have found that your computer has been running sluggish it might be time to do a minor bit of
Courtesty: openclipart.org
maintenance.  Over time your computer accumulates a lot of "stuff", some of it are documents and programs you have created or installed. However, sometimes it is "junk" that you pick up just from browsing online.

Here are some things you can do to help make your computer perform better.  This post will deal mostly with Windows.  If you are using OS X, check out this article from CNET explaining five tips to speed up your Mac.

First thing to do is scan and remove any malware and viruses that have worked their way into your computer.  A couple programs I would suggest is Malwarebytes and Avast antivirus.  Both programs are free, do their jobs well, and are available for both Windows and OS X.  Download and install each program, then launch them one at a time, perform a full system scan and allow the program to either remove or quarantine anything it finds.  If it requests that you restart your computer after, I would.  I would restart it even if it doesn't ask.

If you have a load of tool bars in your website, removing those completely will often speed up your web browsing and some toolbars may be removed through the malware scan.  If this happens, I wouldn't waste time reinstalling any of the toolbars.  Moving forward, any software installs that give the option for a custom install would be better installed this way.  Why?  Often you have the choice of not installing features that you don't actually need.  I always do a custom install on programs, even if I stick with the default settings I will know what it is doing.  Many times you are then given the option to not install that coupon toolbar when installing a program for doing my finances.  Sometimes you might need to re-run a malware scan after removing toolbars.

Change web browsers.  I never use or recommend the Internet Explorer browser that comes with Windows.  There are many other browsers than can do a better job and not be the number one target for malware.  Personally I use Mozilla's Firefox with some add-ons such as NoScript, which blocks clickjacking attempts, Java, Javascript and other executables from running.  If I need a website to load its scripts, I can click on it and choose to temporarily load them or if it is a site like my bank I can tell it to always allow.  Google's Chrome browser is another excellent option.

Open the computer and do a bit of 'dusting' on the inside.  It is not recommended to use a vacuum cleaner to 'suck' out the dust because it can cause static electricity to buildup and a static discharge can kill your computer.  My boss at a former employer zapped a fairly new motherboard when working on a computer because of static discharge.  Grab a couple cans of compressed air and blow out everything you can.  Underneath the motherboard and inside the power supply (from both directions) using that little tube that comes with the can, drive bays, the cables, the casing, everything.

If you have the money and use your computer for doing more than social media, email, finances, and other basic things. you could also upgrade things like the video card and the hard drive.  Newer technology in video graphics have brought us faster processing power and hard drives have grown in storage capacities and speed.  Today you can get a terabyte of storage space for around a hundred bucks and if you wanted to go with a fast hard drive there are the new solid-state drives (SSD) which  perform very well because they have no moving parts, however,the storage capacity isn't (yet) as large as a mechanical drive and the costs are still pretty higher - in my option - for what you get.

And lastly, try your best at keeping your computers software updated, both Windows and device drivers.  If you do most of these, you should find your computer performance being a bit better than it use.  There is one more option you can do if you don't mind basically starting over and that is to do a complete wipe and erasure of the hard drive and reinstalling Windows.  Only do this if you have done everything you can do to improve performance and nothing seems to work.  Save everything you can to re-writable CD/DVD if you can or create a Dropbox or Google Drive account and copy your documents and pictures there.  If after a wipe and reinstall your computer is still not working as good as you remember it and you can't live with it like that, it might be time for a new computer.

Sunday, July 19, 2015

Shopping for a Home Wireless Access Point or Router?


Is your Internet connection kind of pokey?  Have you just bought your first laptop or other wireless device and need a way to get online?  There are many ways of getting your devices online but the best way to do it is with a home wireless access point.  There are many options to choose from but what you want to buy should be based on what your devices can support and how much you are willing to spend.

Notice I keep saying devices and not computer(s).  The reason for this is because wireless access points can be used for more than connecting your computer and laptop to the Internet.  You can use it to connect your wireless TV, share a printer with other networked computers in your home, media streaming device (such as the Roku and Apple TV), gaming systems and more.

You need to determine what are the standards that your devices at home use.  Is it 802.11b (Fair),
802.11g (Good), 802.11n (Better), and 802.11ac (Best).  An easy way to determine in Windows what your computer has it to open the Control Panel > Device Manager and expand the Network Adapter section.  Double click on the network adapter to open properties and click the Advanced tab.  You'll see a screen similar to mine on the right, I've circled the areas where you can see the standards.  For my computer, it supports three standards - 802.11b/g/n.    On a Mac computer, press the Option key and click on the wifi icon in the menu bar.  It will show you a little more detailed information about your wifi connection, the information listed next to "PHY Mode" is what you are looking for.  For other devices, refer to your documentation or the company website to determine the standards it uses.  It is probably safe to say most devices are at least 802.11b/g.  Even if your computer has a lower standard rating there are ways of "upgrading" by buying a network adapter card.

You will need to determine what is it you are going to do on the Internet and how much money you are willing to spend.  Obviously the better the performance, features, speed, etc. the more it is going to cost.  Let's look at three options from the least expensive to the most expensive.  The basic function of each is pretty much the same no matter the cost.  They get you online either wirelessly or wired and have some web browser-based configuration page to make setup easy.


Netgear WGR614
If you are just going to be casually surfing, checking bank accounts, email, Facebook, maybe some
minor game play, or a little bit of movie streaming, then a router like an 802.11g would be just fine.  Check out the Netgear WGR614 Cable/DSL Wireless Router.  Has four Ethernet ports on the back to hardwire devices that either do not have wireless capability or you would rather have it benefit from the quicker wired speed.  It isn't anything fancy but will get the job done.  It can be found online for under a $70 on Amazon, at the time of this post.


Netgear R6300
If you are into streaming video (movies, tv series, etc) heavily, like to play World of Warcraft like a boss, then I would recommend the Netgear R6300.  This is the router I own.  I stream to at several devices in my home (four computers, three tablets, four Roku boxes, three Android cell phones, and one PlayStation 4.  I also needed the ability to stream at a decent rate when not at home on whatever devices I can stream through. Whether it is a cell phone or Chromecast the ability to stream without slowness or buffering was important.  The Netgear R6300 is one of the near top of the line products, I do believe there are several that are even better BUT for what I wanted and need it to do, it has worked perfectly. This one costs under $140 on Amazon, at the time of this post.

Both of the above routers and the majority of other routers include built-in firewalls, to prevent people on the Internet from gaining access to your computer.  Most also incorporate a small number (usually four) of network ports to directly connect a device that either doesn't have wireless ability OR you want to hard wire for better speeds.  These ports are generally always faster than wireless because unlike wireless a hard wired (directly connected) device does not have to share the bandwidth (speed) with other connected devices.  The WGR614 has four 10/100 ports and the R6300 has four 10/100/1000 ports - yes that is a gigabit connection!  Another note, like wireless, the computer has to have hardware that supports gigabit Ethernet, if it doesn't then it will only run at 100 Mbps.  Again, most computers have the ability to upgrade their Ethernet cards, even if yours is built into the motherboard a gigabit network adapter card could be purchased and installed.


Asus AC2400
If you are one of those people who need to have the biggest, best, fastest thing out there.  Then might I interest you to the Asus AC2400 RT-AC87U Dual-band Wireless router.  This router boasts a whopping 2333 Mbps in bandwidth speed - making it one of the fastest home wireless router on the market and it is shaped rather nicely, compared to the typical rectangle shape of other routers.  It also claims to have the ability to help prevent malware and viruses from infecting your computer.  Check out this c|net review if you want to learn more about it!  It does not come cheap though!  At the time of this post, it could be bought on Amazon for $238.00!


Sunday, July 12, 2015

How To Reset Your Windows Password

If you have forgotten your log in password for your Windows computer, fret not there are a few things you can do to get back in.


Clean Install Windows in 15 Easy Steps
This is more of a last resort option, completely wipe your hard drive and reinstall Windows.  Obviously, you would want to backup your data but if you can't log in this poses a bit of a challenge.  It can be done though with an inexpensive external USB hard drive enclosure and another computer.  Simply turn off your computer, remove its hard drive, insert it in the enclosure (following the instructions) and connect it via USB to another computer.  You can then browse the drive the same way you would any other USB jump drive and copy off documents, pictures, etc. that you want to keep.  Once done, put the drive back in the computer. 
  1. Boot from you Windows 7 DVD
  2. Once Windows Setup loads, you can choose your language, time and currency format, and
    keyboard or input method.  Once selected, click on Next then click on "Install now" on the screen following.
  3. Click the check box to accept the license terms for Windows.
  4. When prompted for a type of installation you want, choose Custom.
  5. When asked where do you want to install Windows, click the "Drive options (advanced)" link on the lower right of the dialog box.
  6. You want to delete all of the partitions shown, click on a disk partition and then click the Delete link.  Just a reminder that once you delete a partition, there is no undo or change of mind.
  7. You now should only see one "Disk 0 Unallocated Space", click on it to select it and then click the Next button.  No need to create any partitions, Windows setup will do this for you.
  8. Windows will now install itself.  Depending on the speed of your computer and how big your hard drive is, this could take quite some time.
  9. Eventually, you will be shown a Setup Windows dialog box and it is asking for you to type in a user name and a computer name.  Fill in both boxes with the information you want then click next.
  10. On the next screen, type in a password.  Since the last password was forgotten, you might want to include a password hint - notice how it is a required field!
  11. On the next screen it asks for the Windows Product Key, this is often found on a label underneath or on the back of the computer .  It looks something like this:
    ABCDE-FHGIJ-KLMNO-PQRST-UVWXT
  12. Choose the way you want your computer to handle updates.  Suggest clicking on the recommended settings.
  13. Select your time zone from the drop down menu and adjust the date/time if needed then click next.
  14. On the location of your computer, most likely you are doing this at "home" (even if you are doing it at a friend's house, it is still considered "home") so click on Home Network.  If Windows prompts for setting up a homegroup, you can skip that for now.
  15. Windows setup will do a little housekeeping, and then voila! you are at the desktop.  If you enabled automatic updates back in step 12, it will begin to prompt you about downloading and/or installing them.  I would suggest doing the updates until there are none left.
Congratulations!  You have successfully reinstalled Windows. Only thing left is to install any printers or other accessories and install the software programs you want back on.


Clearing Your Windows Password
Another option you have, if you have access to another computer OR create it ahead of time, like right after reading about it for example, is to use a Password & Registry Editor.  This program will not change the password, it simply clears it so when you boot up your computer it lets you sign in without a password.  After which you can open the Control Panel and go to the User Accounts and add a password.  Again, I would setup that password hint to prevent having to do this again in the future!

  1. First thing we want to do is download the "Offline NT Password & Registry Editor" it is a free
    program and can be found here. You'll need to scroll down a ways.  There are two versions to pick from, one is to make a bootable CD and the other is for using a bootable USB drive.  Choose the one you want to use and scroll the site down a little more and it will instruct you on how to create the bootable media.
  2. Restart the computer and boot from your newly created bootable media.
  3. When the program loads and you see "boot:" on your screen, press the enter key.  If Windows loaded, you didn't boot off your bootable media correctly, restart the computer and try again.
  4. After a bit of information gets shown on the screen, none of which you have to be concerned about as it is just showing you what the program is doing as it starts up, you will be prompted to "Select partition by number."  Most likely you can just press enter to accept the default partition.  If you have more than one hard drive or have multiple partitions, you will need to type the number for the partition that Windows is installed on.
  5. Next it will ask to confirm the location of the Windows Registry.  Most likely the default location that it finds is correct, so press Enter to continue with the default path of Windows/System32/config.
  6. When asked to "select which part of registry to load", choose 1 to reset the password.
  7. Then when it asks "What to do" after it "Loaded hives" you want "1 - Edit user data and passwords" then press enter.
  8. You should now see a list of users from your computer.  Type the username to change and press enter.
  9. When the User Edit Menu appears, type 1 and press enter to clear the password.
  10. The password should now be cleared.  Type ! to quit editing the user and press enter.
  11. Type q to quit. and then answer Y to the "Step FOUR: Writing back changes" prompt to save the changes.  
  12. You should then see an "***Edit Complete***" message on the screen.  Press enter to answer no to the "New run?" prompt. 
That's it, all done.  You can reboot your computer and be able to login without a password.  IF you were the only person to use the computer then Windows will boot directly to the desktop, otherwise click on your username from the login list and it will sign you in without a password.  Now would be a good time to set a password and put a hint in just in case you forget in the future.

Sunday, July 5, 2015

How to Lock Down Your Child's iPad - PART TWO

In this segment, I'll go through how to use Apple Configurator to lock down your child's iOS device.  There are is an advantage to using Apple Configurator to using the devices Restrictions settings.  Apple Configurator is available, at this time, only for OS X so you will need to own or have access to a Mac computer with one free USB port - desktop or laptop does not matter.  It can be downloaded through the Apple App Store.  Be advised Apple Configurator will completely erase the iPad in order to supervise the device.


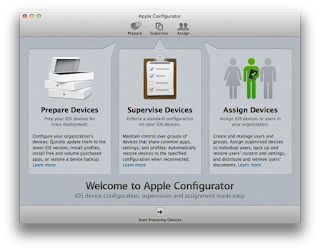
Launch Apple Configurator for the first time and you are greeted with the following screen giving
you a brief description of each section of the program.  For locking down your device you'll stick with the first two sections: Prepare Devices and Supervise Devices.  When you are ready to continue, click on the arrow at the bottom middle to "Start Preparing Devices."  This screen only appears the first time launching the program.


Let's first explore the Preferences, click on Apple Configurator from the top pull down menu and then select Preferences from the menu.  You will be greeted with the following screen.  I would recommend unchecking both boxes to prevent Configurator from making changes to the device should you connect it later on down the road.


Click on the Lock Screen tab at the top of the preferences  box and you are given a couple options of how the lock screen will appear.  Here you can add your own custom wallpaper if you like.  Find an image on your computer, using Finder, click once on the image to select and drag and drop to the image location in the preferences panel.  You can also choose to show the name of the device on the lock screen by select the proper radio button on the left side of the panel.  When you are done, click the red circle in the upper left corner of the Preferences panel.


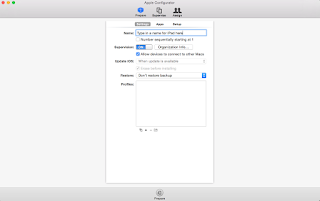
 You are now on the Prepare tab of Apple Configurator.  There are a couple more settings to make before processing your iPad.  First at the top of the screen you can type a name for the iPad.  (Ex. Mac Morrow's iPad)  Click on the toggle button next to Supervision.  Then you can click on Organization Info and fill in the blanks with your personal contact information.  This information is stored within the iPad and could potentially be used by someone who finds your lost device in returning it.  Next you will want to click the + sign at the near bottom middle of the screen and then select "Create New Profile" from the mini dialog box.


On this screen you will need to first type a name for this profile.  Using "Restrictions", without the quotes, is a good enough name.  But you can type anything you want that will help you remember what it is.  Organization, Description, and Consent Message are all optional fields and can be skipped.  In the Security section, I would suggest changing it to "With Authorization".  This causes a "Authorization password" box to appear where you can type in a password that is easy for you to remember.  It would be needed should you ever decide to remove this profile.  Leave "Automatically Remove Profile" set to 'Never'.


On the left side of the screen you will see a LOT of choices.  Every section could potentially be configured and applied to the iPad from restriction settings, to adding your home wifi network credentials, to email settings.  For this article, we are only to going to look at Restrictions.  I would suggest checking out Apple's Configurator help page.  Click on Restrictions and then select Configure on the right side.


Here you are now given three tabs of settings that you can toggle to allow or disallow, by clicking on a check box.  If you want to, for example, not allow your child to install apps, then you would uncheck the box "Allow installing apps."  Just remember, to allow the Apple App Store and installing apps you will have to remove the profile and then connect the iPad to the computer and re-apply the profile when ready to remove the Apple App Store.  Browse through the three screens and make any setting adjustments that you want.  I would recommend NOT setting a rating for apps.  Doing so will prevent apps with no rating by the developer from being used from working.  When you feel you are done click the 'Save' button.


Your screen should look similar to this example.  You now have a Restrictions profile!  Connect your iPad to the computer using its USB cable from the charger.  When Configurator recognizes it a little number will appear on the Prepare tab icon at the top of the screen indicating how many devices are currently connected.  Leave the profile unchecked for now and click on Prepare at the bottom of the screen.  The program will erase the iPad, update the operating system to the most current version and when it is finished you will see the number now appears on the Supervised tab.  If it doesn't, the most likely culprit is the supervision toggle is off.  No fret, turn it on and then click Prepare at the bottom of the screen again.  Click on the Supervise tab and keep the iPad still connected.


You are almost done!  On the supervise tab, notice it has some of the same options as the prepare tab has.  Make no changes here.

When you are ready to, click on the check box next to Restrictions in the Profiles box to select it.  Then click the "Refresh" button at the bottom of the screen.

Depending on what features you disabled (iMessages, App Store, etc.) you will see those apps disappear from the home screen of the iPad when the process completes.


BONUS MATERIAL:
Did you notice the tab called "Apps"?  There is a way to add apps to the iPad without turning on the App Store again.  If you click the Apps tab and then click the + sign, this will open a navigation window.  Browse to your iTunes folder in a location similar to the following:

Mac HDD > Users > Your User Name > Music > iTunes > iTunes Media > Mobile Applications

You will, if you have downloaded apps before, see a list of apps.  Click on the app or apps that you want to add.  Note:  Apple Configurator cannot do paid apps without you having an Apple Volume Purchase Program account.  VPP is normally used by education and business, I do not know if a regular consumer can sign up for it.  Feel free to try if you want, by clicking this link to Apple.  Paid apps are shown in the list an oval with a number inside.  The number would indicate how many licenses you have bought, zero is default because you would have to add the license(s) to the program.  Free apps can be installed now.  Just click on the check box next to the app(s) that you want to install and when ready click "Refresh" at the bottom of the screen.  Depending on the number of apps and the sizes the process can take just a couple of minutes to well over an hour!!