If you are like me you probably have hundreds of photos and videos on your cell phone but would like a way to back them up. In the past I used to use Dropbox as a method of backup. I had my cell configured where I would take a picture and a copy would instantly be uploaded to Dropbox. This method worked PERFECTLY for years, but April 1, 2018 there are some changes coming with Dropbox and Samsung which would alter the ease and effectiveness of this process. If you want to read about this, click here.

So in looking for a method to backup my pictures in a way similar to Dropbox, I found a program called PhotoSync. The program has several ways to back up your photos, but for me and this article it is solely about using it to backup to a computer. There are two parts to the program, one you install on a computer where you want to save your pictures to and the other is an app installed on your cell or tablet - works on Android and iOS.

The install on the computer is pretty straight-forward. Once installed click on the icon in the system tray and open Settings. If it is not already checked click on the box to load PhotoSync on system startup. Then click the "Receive" option in the left side menu.
On this screen you can configure the location where PhotoSync will save pictures and videos to. In my example, I have a dedicated drive that I choose to have it save to.
On your phone or tablet, open the app and you are greeted with a screen showing your devices library of all the photos and videos stored on it. If your device has an SD card installed and you store your videos and pictures there, they will show up as well!
Tap on the three vertical dots in the upper right corner of your screen and then tap on Settings. My screenshots are from an android device so it is possible your settings may vary if you are on an iOS device.
The PhotoSync Preferences box should appear. When it does, tap on the Quick Transfer option and you can configure your computer by following the on-screen prompts. Selecting your computer when it is found.
If you purchase the program you can make use of the Autotransfer option where when you arrive home and your device connects to your home wifi it will automatically upload your new pictures and videos for you.
At the time of this article, the program was less than $3 so I bought the program and have been extremely pleased with it.

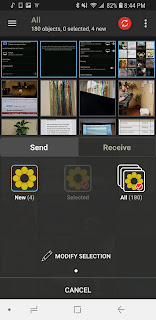
If you prefer to use the free version, you will use the manual sync option. To do so, tap on the red sync circle at the top right of the screen. Again, my screenshots are from an android device so the location may or may not differ from your device if it is iOS.
If this is your first sync ever, tap on the "All" button and it will upload everything from your cell to the computer. Otherwise you will mostly use the "New" button.

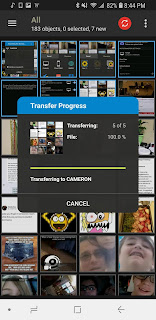
Tap on it and then tap on "Computer" and then tap on your computer name from the list and the file transfer will begin.
You now have your own personal storage system for your devices photos and videos. Storage space limited to your available drive space and if your computer can be expanded upon you can add additional hard drives to it.
