Pages

Showing posts with label iPad. Show all posts

Thursday, February 18, 2016

Don't Roll-back Your iOS Date - You'll Regret It

Beware of postings on social media stating if you open your iOS settings and change the date to
January 1, 1970 you will be greeted with an easter egg of a retro Apple logo on your screen.

Resetting your date to this extreme will basically brick your device and at this time Apple does not have a fix for it - but they are working on a fix for an upcoming software update which has not been announced for a release date. 

For now, if you have become one of the unlucky ones to fall for this trick, the only remedy is a visit to the Apple Genius Bar and most likely they'd replace the device.

This issue affects most newer devices: iPhone 5S, iPad Air, iPad Mini 2 and newer.

So unlike what the Nike commercials tell you, this time - just don't do it.

For more information, please visit the Apple Support site for this issue:
https://support.apple.com/en-gb/HT205248


Saturday, December 12, 2015

HELP! I'm STILL out of storage space on my iPad!!

This is a follow-up article to my previous post "Help! I'm out of storage on my iPad!".  When iOS 8.1 was released it introduced a new feature when you delete pictures and videos they are moved to a "Recently Deleted" section in your devices Gallery app. Where they remain for 30 days and then they are automatically removed or you can manually delete them sooner.


There is a bug in iOS where sometimes deleting your pictures and videos, including removing them from the Recently Deleted section does not free up space on your device.  One can spend quite a bit of time removing apps, restarting the device, etc., to no benefit.  So how do you recover the space?  You could go to the extreme of wiping the device but try the following first.

  • Go to Settings > General > Date & Time
  • Disable Set Automatically
  • Tap on the current date & time and roll it back 2-3 years
  • Tap General in the upper left and then press the Home button
  • Launch the Photos app and go to the Recently Deleted album (even if it says there are 0 photos)
  • Is it full of photos? If so, delete them!
  • Go back to Settings > General > Date & Time and turn Set Automatically back on

You can now open Settings > General > About and check what it says the free space is.  Keep checking back and you may find the free space keeps increasing!  I recently looked at a fellow co-workers iPad Air which started out with 0 MB of free space and within minutes of completing these steps the iPad had 7.4GB of free space!


Saturday, September 19, 2015

HELP! I'm out of storage on my iPad!!

Image source: http://cdn9.howtogeek.com

I am often asked, "my iPad is telling me I am out of free space, what can I do to get more?"  Unlike most Android tablets which have an SD card slot for expanding storage, the iPad does not have one.  Sure you can buy the 5-in-1 camera connection kit but really who wants have a gadget sticking out the bottom of their device?

So what can you do?  To start off, delete apps you no longer use or need.  This is as simple as browsing your home screens, tap and hold on an app until it begins to wiggle and then tap on the x in the corner of the app to remove. 

If, after removing unwanted apps, you still do not have enough free space.  Open SETTINGS > GENERAL > USAGE > MANAGE STORAGE.  This will show a list of items from the largest storage hog to the smallest.  Often I see, as in this example, "Photos & Camera" taking up the most space.  Often several gigs of data is used.

You have a couple options for fixing this!  The first, delete some pictures and videos.  I'd start with videos first, they generally take up more space than pictures do. 

Another option, the solution I use and recommend, is to create a  Dropbox account, download and install the app from either the Google Play store or Apple App store, then enable automatic Camera Uploads in the Dropbox app settings.  I do this on my cell phone and my tablet.  Soon as I take a picture or record a video, it gets uploaded to a "Camera Uploads" folder in Dropbox automatically. 

Image source: Dropbox.com
Don't be too concerned that you start with 2GB of data.  They offer many ways to obtain FREE storage increases and sometimes run 'special' promotions.  For example, in 2012, they would increase your storage by having camera uploads turned on and at the time the more pictures you uploaded within the designated timeframe you would get more storage.  The promotion had a limit of 4.5 GB of storage, which is still a lot of pictures!  By the time the promotion was done, I had increased my storage space to 6.5 GB.  You can also refer friends and when they sign up you earn a bonus 125 MB per friend.  Sometimes the device you use to sync to Dropbox can give you an unexpected bonus.  My Galaxy S Tab when I activated Dropbox on it, gave me a whopping 50 GB of additional storage space!  I currently have 56.5 GB of cloud storage to use in any way I want and didn't have to spend a penny for a premium account.  Of course, you can upgrade to a paid plan and get a whole lot more storage - at the time of this post, you can get 1 TB of storage for under $100 a year.  Another nice benefit of this is you can browse your cloud storage, not just from your phone or tablet but also from any internet connected computer!  This is the solution I suggest and recommend and have been using it since 2011.  As another nice feature, you can also manually move many documents on your device to Dropbox.  Look for the "Open In..." icon to see if your app gives the option to save to another location other than the device.  In cases where there is not, you can always email the file to yourself.  This could be a long process if you have a lot of data to save.  You can even try connecting your iPad to iTunes and see if you can transfer files using it.
Image source: http://travelinlibrarian.info

Google Drive is another cloud storage solution that would also allow you to access your pictures and files from any internet connected computer.  With it, you would enable Backup & Sync from within Google Photos.  I am quite happy with Dropbox, and therefore I have not investigated Google's option thoroughly to be able to praise it enough to truly recommend.  Google Apps, might be a future post one day.

Now for more drastic measures!  If after you have done everything above to free up space and still need more, you could wipe the iPad and start it from fresh!  iOS 9 uses less space than previous versions did, which is good.  So going this direction, delete as many apps as it takes to get enough free space to upgrade.  Then update the iPad by going to SETTINGS > GENERAL > SOFTWARE UPDATE.  Go through the process by following on screen directions, it'll take a little while to download and install so be patient.  Once the iPad has finished the upgrade process, go back to SETTINGS > GENERAL and scroll the right side of the screen down to the bottom and tap on RESET and then select Erase All Content and Settings.  This will erase everything and the iPad will be back at factory settings.  Complete the initial setup of the iPad and sign into the Apple App store and reinstall the apps you want by tapping on the Purchased tab at the bottom and tap on the cloud icon next to the apps.  Don't forget to setup your Dropbox or Google Drive apps from the start so it will backup your data from the beginning!

Sunday, July 5, 2015

How to Lock Down Your Child's iPad - PART TWO

In this segment, I'll go through how to use Apple Configurator to lock down your child's iOS device.  There are is an advantage to using Apple Configurator to using the devices Restrictions settings.  Apple Configurator is available, at this time, only for OS X so you will need to own or have access to a Mac computer with one free USB port - desktop or laptop does not matter.  It can be downloaded through the Apple App Store.  Be advised Apple Configurator will completely erase the iPad in order to supervise the device.


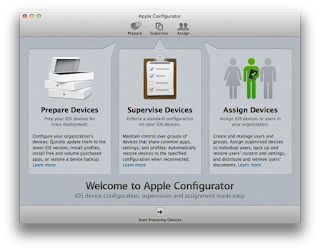
Launch Apple Configurator for the first time and you are greeted with the following screen giving
you a brief description of each section of the program.  For locking down your device you'll stick with the first two sections: Prepare Devices and Supervise Devices.  When you are ready to continue, click on the arrow at the bottom middle to "Start Preparing Devices."  This screen only appears the first time launching the program.


Let's first explore the Preferences, click on Apple Configurator from the top pull down menu and then select Preferences from the menu.  You will be greeted with the following screen.  I would recommend unchecking both boxes to prevent Configurator from making changes to the device should you connect it later on down the road.


Click on the Lock Screen tab at the top of the preferences  box and you are given a couple options of how the lock screen will appear.  Here you can add your own custom wallpaper if you like.  Find an image on your computer, using Finder, click once on the image to select and drag and drop to the image location in the preferences panel.  You can also choose to show the name of the device on the lock screen by select the proper radio button on the left side of the panel.  When you are done, click the red circle in the upper left corner of the Preferences panel.


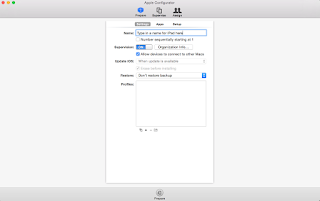
 You are now on the Prepare tab of Apple Configurator.  There are a couple more settings to make before processing your iPad.  First at the top of the screen you can type a name for the iPad.  (Ex. Mac Morrow's iPad)  Click on the toggle button next to Supervision.  Then you can click on Organization Info and fill in the blanks with your personal contact information.  This information is stored within the iPad and could potentially be used by someone who finds your lost device in returning it.  Next you will want to click the + sign at the near bottom middle of the screen and then select "Create New Profile" from the mini dialog box.


On this screen you will need to first type a name for this profile.  Using "Restrictions", without the quotes, is a good enough name.  But you can type anything you want that will help you remember what it is.  Organization, Description, and Consent Message are all optional fields and can be skipped.  In the Security section, I would suggest changing it to "With Authorization".  This causes a "Authorization password" box to appear where you can type in a password that is easy for you to remember.  It would be needed should you ever decide to remove this profile.  Leave "Automatically Remove Profile" set to 'Never'.


On the left side of the screen you will see a LOT of choices.  Every section could potentially be configured and applied to the iPad from restriction settings, to adding your home wifi network credentials, to email settings.  For this article, we are only to going to look at Restrictions.  I would suggest checking out Apple's Configurator help page.  Click on Restrictions and then select Configure on the right side.


Here you are now given three tabs of settings that you can toggle to allow or disallow, by clicking on a check box.  If you want to, for example, not allow your child to install apps, then you would uncheck the box "Allow installing apps."  Just remember, to allow the Apple App Store and installing apps you will have to remove the profile and then connect the iPad to the computer and re-apply the profile when ready to remove the Apple App Store.  Browse through the three screens and make any setting adjustments that you want.  I would recommend NOT setting a rating for apps.  Doing so will prevent apps with no rating by the developer from being used from working.  When you feel you are done click the 'Save' button.


Your screen should look similar to this example.  You now have a Restrictions profile!  Connect your iPad to the computer using its USB cable from the charger.  When Configurator recognizes it a little number will appear on the Prepare tab icon at the top of the screen indicating how many devices are currently connected.  Leave the profile unchecked for now and click on Prepare at the bottom of the screen.  The program will erase the iPad, update the operating system to the most current version and when it is finished you will see the number now appears on the Supervised tab.  If it doesn't, the most likely culprit is the supervision toggle is off.  No fret, turn it on and then click Prepare at the bottom of the screen again.  Click on the Supervise tab and keep the iPad still connected.


You are almost done!  On the supervise tab, notice it has some of the same options as the prepare tab has.  Make no changes here.

When you are ready to, click on the check box next to Restrictions in the Profiles box to select it.  Then click the "Refresh" button at the bottom of the screen.

Depending on what features you disabled (iMessages, App Store, etc.) you will see those apps disappear from the home screen of the iPad when the process completes.


BONUS MATERIAL:
Did you notice the tab called "Apps"?  There is a way to add apps to the iPad without turning on the App Store again.  If you click the Apps tab and then click the + sign, this will open a navigation window.  Browse to your iTunes folder in a location similar to the following:

Mac HDD > Users > Your User Name > Music > iTunes > iTunes Media > Mobile Applications

You will, if you have downloaded apps before, see a list of apps.  Click on the app or apps that you want to add.  Note:  Apple Configurator cannot do paid apps without you having an Apple Volume Purchase Program account.  VPP is normally used by education and business, I do not know if a regular consumer can sign up for it.  Feel free to try if you want, by clicking this link to Apple.  Paid apps are shown in the list an oval with a number inside.  The number would indicate how many licenses you have bought, zero is default because you would have to add the license(s) to the program.  Free apps can be installed now.  Just click on the check box next to the app(s) that you want to install and when ready click "Refresh" at the bottom of the screen.  Depending on the number of apps and the sizes the process can take just a couple of minutes to well over an hour!!

Wednesday, June 24, 2015

How to Lock Down Your Child's iPad - PART ONE

Yes, a second article in the same week!

I've been asked before "How can I lock down my child's iPad?"  I thought I would share with everyone my suggestions.

There are two ways you can go about doing this.  One is via Restriction settings and the other way is using Apple Configurator.  Please be aware, Apple Configurator is only for Apple Mac computers, it is not (yet?) available for Windows or any other operating system.  The following instructions are set for iOS 8.3, however, they will work for prior versions as well.

Restrictions
  • On the iPad, locate and tap on the Settings app.
  • Tap on the General section on the left, it should go there automatically though.
  • Scroll the right side of the screen down until you see "Restrictions" and tap on it.
  • Tap on the "Enable Restrictions" at the top of the screen.
  • Enter a 4 digit passcode that you will not forget then re-enter it to confirm.
 You now have several options to toggle and set as shown in the following image!  (The settings shown below are the default settings.)


 Let's just walk through each section, shall we?

The first two sections are the "Allowed" section.  Some of these are self-explanatory but I'll go through them anyway.  Here we can toggle off/on:
  • Safari - if you don't want your kids to have access to the Internet.
  • Camera - if you don't want lots of selfies, random pictures or worse inappropriate photos.  Turning this off also disables the ability to record video.
  • FaceTime - turning this off eliminates the ability of using the iPad to make or receive video calls.
  • Siri & Dictations - turning this off eliminates the use of the integrated "personal assistant" Siri.
  • Airdrop - by toggling this off, the iPad will be unable to share items with other iOS devices or Mac computers.
  • iTunes Store - removes the ability to buy and download music, movies, television shows, audiobooks, etc.
  • iBooks Store - removes the ability to buy and download books to the iPad.
  • Podcasts - turning this off removes access to podcasts
  • Installing Apps - turning this off will prevent apps from being installed and removes the Apple App Store from the device.
  • Deleting Apps - toggling this off will prevent apps from being removed once installed. 
  • In-App Purchases - turning this off prevents the ability to purchase content from with-in an app.

Allowed Content
  • Ratings For - choose the country in which you reside for ratings based on that location
  • Music, Podcasts & iTunes U - within this section you toggle off/on whether any material containing explicit content is allowed.  Default is allowed.
  • Movies - within this section you can set the movie ratings from not allowing movies through PG-13 to allow everything.
  • TV Shows - similar options as the movies section.
  • Books - in this section you can toggle off/on if any sexually explicit content is allowed, default is allowed.
  • Apps - within this section are age ranges for apps that are allowed. Ranging from not allowing apps, to 9 years old and up to allowing all apps.  Please note that setting any rating beyond the default of Allow All Apps may result in some apps no longer functioning due to the developer not including a content rating.  If a developer does not set a rating the iPad will not open the app and might even remove it.
  • Siri - inside this section allows you to turn off the explicit language and the ability to search web content.
  • Websites - changing settings here from the default All Websites to Specific Websites Only.  Each setting is customizable.
  • Password Settings - set how often you want prompted for your Apple ID password when obtaining apps.

Privacy
  • Each of the settings within this section allow whether or not you authorize or want to revoke a previous authorization regarding traceable content, useability, etc.

Allow Changes
  • Accounts - disallowing changes prevents adding, removing, or modifying accounts in Mail, Contacts, and Calendars.
  • Background App Refresh - disallowing changes this prevents apps from updating their info while they are not being currently used.
  • Volume Limit - allows you  set a limit on how loud the headphones can get.

Game Center
  • Turning off either or both settings prevents multiplayer games and the ability to add friends to games.

Hopefully this helps you with setting options on your or your child's iPad.  This is one of the easier ways to "lock" down an iPad.


Apple Configurator
I will discuss this in "How to Lock Down Your Child's iPad - PART TWO"